QTECH QVP and QIPP — setup for our PBX
QTECH is a Russian network equipment vendor, and its QVP and QIPP desk phones get bought where the customer must source hardware from the Russian product register: chains with public contracts, venues attached to institutions, franchises with import-substitution requirements. The most common ones are the plain two-line QVP-80P, QVP-95P, QVP-100(P), QVP-200(P); the manager's desk and the front office get the multi-line QVP-300P/400PR/500PR/600P.
All of these phones share one web interface — a black-and-red menu on the left (“Состояние телефона” — Phone status · “Сеть” — Network · “SIP аккаунты” — SIP accounts · “Программируемые кнопки” — Programmable keys · “Настройки телефона” — Phone settings · “Телефонная книга” — Phone book · “Обслуживание телефона” — Maintenance · “Безопасность” — Security) and a language selector in the top right corner.
General credentials, ports and network rules are on the overview page “SIP phone setup”.
What you will need#
- Extension credentials from the admin panel: SIP server, extension number, login, password, port
5060, transportUDP. Where to get them — “Credentials” (Telephony → Staff & groups → “Reset password”). - The phone on the same network as your computer: a cable into the phone's LAN port (the PC port is a pass-through for a computer).
- A computer with a browser on that same network.
- A power supply: PoE exists on models with a
Pin the name (QVP-80P, QVP-95P, QVP-100P, QVP-200P, QVP-300P…). The QVP-100 and QVP-200 without thePrun off the adapter only.
Step 1. Find out the phone's IP address#
Out of the box the phone takes its address over DHCP, and QTECH has a dedicated key for reading it:
- Press the “C” key on the phone — the device's IP address appears on the screen.
- Write it down: you will need it in step 2.
If there is no address, the phone did not get one. Check that the cable is in the LAN port and, if needed, set the address by hand: Menu → Phone settings → Advanced settings → password admin → Network → LAN port, where you pick DHCP, Static or PPPoE. After a mode change the phone asks for a reboot (“Network is changed, press OK reboot”).
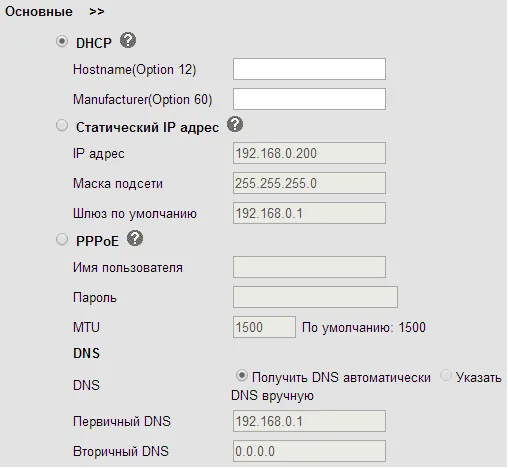 Screenshot: QTECH QVP-100/QVP-100P user manual, p. 25.
Step 2. Log in to the web interface#
Open the address from step 1 in your browser — just http://<phone IP>.
| Factory value | |
|---|---|
| Address | http://<phone IP> (the default web port is 80) |
| Login | admin |
| Password | admin |
Both are case-sensitive. The phone asks for the same admin password on the device itself when you enter the advanced settings.
The phone status page opens. If the interface is in Russian, switch it with the language selector in the top right corner.
If the password has been changed and nobody knows it, there is no way to recover it — only a factory reset helps.
Step 3. Enter the PBX credentials#
Pick “SIP аккаунты” (SIP accounts) in the left menu, choose “Аккаунт1” (Account 1) in the drop-down at the top of the page and fill in the fields of the basic block:
| In the admin panel (“Extension credentials”) | In the phone (SIP accounts → Account 1) |
|---|---|
| SIP server | SIP сервер (SIP server) — a required field, marked with an asterisk |
| Login | Имя пользователя (user name — the authentication name) and Имя (the name the phone registers under) — the whole sip-…-<extension> string in both fields |
| Password | Пароль (password) |
Port 5060 |
there is no separate field: the port is appended to the server address after a colon, and 5060 is the default anyway. Leave the local SIP port under the phone settings alone |
Transport UDP |
Транспортный протокол для SIP (SIP transport protocol) — a UDP / TCP / TLS radio button; you need UDP |
| Extension number | Отображаемое имя (display name, also the caller ID) and Метка (label) |
Be sure to tick “Использовать” (Use) at the top — without it the account is disabled. Leave the backup SIP server, the outbound proxy and the backup outbound proxy empty, and set NAT traversal to “Нет” (No). Press “Применить” (Apply) at the bottom of the page.
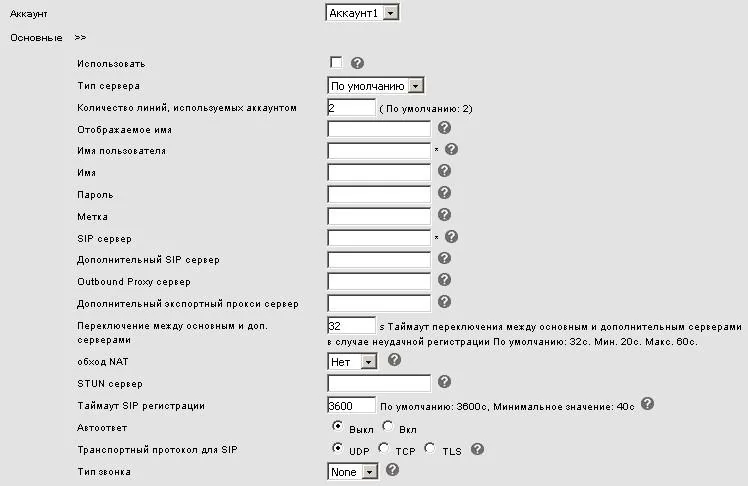 Screenshot: QTECH QVP-100/QVP-100P user manual, p. 29.
If it is easier to type it on the phone itself, without a computer
- Menu → Phone settings → Advanced settings.
- Enter the phone password —
adminby default. - Choose SIP accounts and the account you need.
- Fill in: account enable —
On; the on-screen name — the extension number; the user ID — the wholesip-…-<extension>login (this is the authentication name); the account — the same login (the phone registers under it); the user password — the password; the SIP server — the PBX address. - Press Save.
Leave the proxy server (the outbound call server) empty and STUN switched off.
Optional: codecs, encryption, time
- Codecs — SIP accounts → the account's codec block: keep G.711A and G.711U on top; on the HD Voice models you can add G.722.
- Encryption — the security block of the SIP accounts section has SIP encryption and RTP encryption: do not turn them on, the platform does not offer them. For the same reason do not pick the
TLStransport. - SIP registration timeout — 3600 s by default, no need to change it.
- Time — Phone settings → SNTP: set the venue's time zone, otherwise the call log will be shifted.
- The web port is changed in the advanced settings; if it has been changed, the address has to include it —
http://192.168.0.200:88.
Step 4. Check the registration#
- In the web interface: the phone status page, the registration status block — next to “Аккаунт 1” the red “Отсутствует” (none) should give way to a successful registration. The network status block right below shows the phone's LAN IP address.
- On the phone: the line name appears on the screen and the “no network” icon disappears.
- In the admin panel: Telephony → the Staff & groups tab — a green dot lights up next to the operator, together with the string the phone used to introduce itself. The status refreshes no more than once a minute.
- A test call: dial a colleague's extension from the phone.
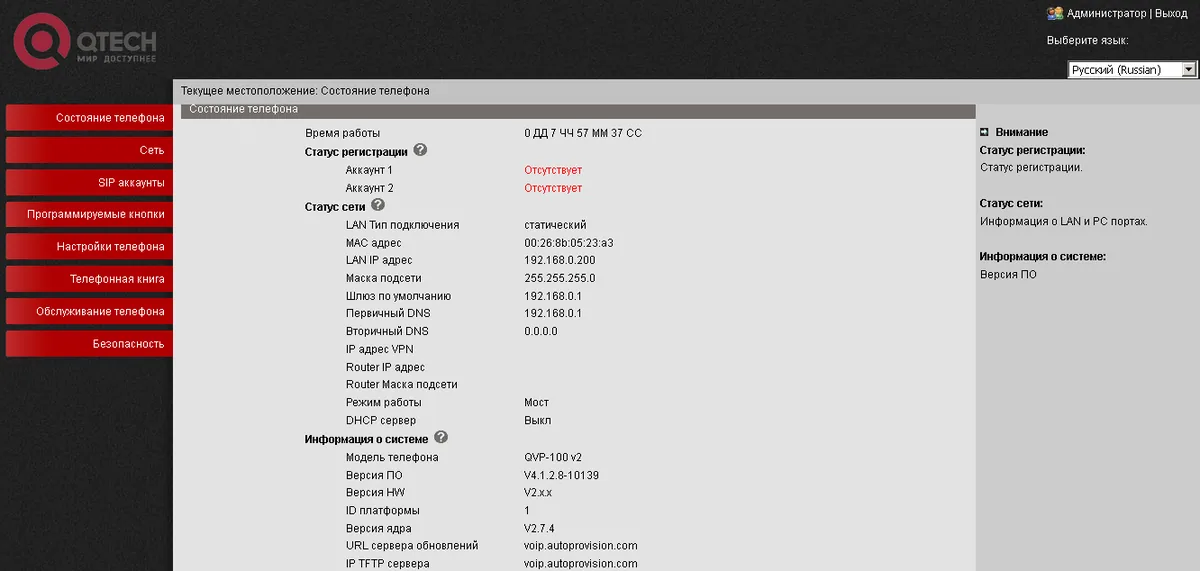 Screenshot: QTECH QVP-300P user manual, p. 23.
Audio quality — the *43 echo test. The green dot only speaks about registration: the voice travels as a separate stream and breaks separately. Dial *43 on the phone and press Send / OK (most devices do not start dialling on a star key by themselves). The PBX answers, plays a short beep after a second and then plays your own voice back to you — speak into the handset for about ten seconds and listen to yourself. You hear both the beep and yourself: audio flows both ways. Beep but no voice: audio does not reach the PBX from the phone (SIP ALG on the router is the usual culprit). Not even a beep: audio does not reach the phone from the PBX. All outcomes and the measured numbers (loss, jitter, latency) are covered in “Checking call quality”.
Factory reset#
A reset is needed if the phone came second-hand (it holds someone else's account and, worse, someone else's provisioning address that restores its own settings on every reboot), if the web password has been forgotten, or if the device behaves unpredictably.
From the web interface (the way the vendor documents): the left menu Maintenance → Basic → Factory settings → the “Возврат к заводским настройкам” (Restore factory settings) button. The change takes effect after a reboot, which starts by itself.
 Screenshot: QTECH QVP-100/QVP-100P user manual, p. 57.
From the device QTECH documents no separate reset item ⚠️ verify — the phone only offers the advanced settings behind the same admin password. So if both the web password and the advanced-settings password are lost at once, contact QTECH support: guessing is pointless.
The reset wipes every current setting — accounts, network, programmable keys, phone book; the firmware stays. Afterwards the login is admin/admin again, the phone takes its address over DHCP, and the setup starts from step 1.
If the phone does not register#
- The “Use” box is unticked. The account is disabled — the most common reason for “everything is filled in and nothing happens”.
- The login is incomplete. You need
sip-…-<extension>, not the extension number alone, and in both fields — the user name and the name. - The password is stale. Somebody pressed “Reset password” in the admin panel — issue a new one and type it again.
- Transport. The SIP transport protocol radio button must be on
UDP; choosingTLSproduces silence with no error message. - Encryption is on. SIP encryption or RTP encryption in the security block — switch them off.
- The outbound proxy is filled in. If the previous provider's address is still there, the registration goes to the wrong place — clear it.
- NAT traversal (STUN) is on. Our PBX needs no STUN; set it to “No”.
- The phone got no IP. The “C” key shows nothing — check the cable in the LAN port and DHCP on the network.
- The venue network. SIP ALG on the router, a guest Wi-Fi with client isolation, UDP 5060 blocked — see the overview.
Still stuck — or the phone is registered but there is no audio, calls drop after 30 seconds, incoming calls do not arrive? Troubleshooting by symptom — “Phone not working”; on-screen messages and error codes — “Not registering: error codes”.
Models in the family#
| Model | Screen / lines | PoE | Setup specifics |
|---|---|---|---|
| QVP-80P | 128×64 mono, 2 lines | yes | 25 keys, 5 programmable |
| QVP-95P / QVP-95PR | 128×64 (132×64 on the 95PR) mono, 2 lines | yes | Cyrillic keypad |
| QVP-100 / QVP-100P | 128×64 mono, 2 lines | on QVP-100P | 13 programmable keys; the vendor's most detailed manual covers this model |
| QVP-200 / QVP-200P | 132×64 mono, 2 lines | on QVP-200P | 2 programmable keys |
| QVP-300P / QVP-300PR | 132×64 mono, 3 lines | yes | 12 programmable keys, gigabit ports |
| QVP-400PR | 2.4″ 320×240 colour, 2 lines | yes | 5 programmable keys |
| QVP-500PR | 2.8″ 320×240 colour, 6 lines | yes | 5 programmable keys |
| QVP-600P / QVP-600PR | 4.3″ 480×272 colour, 8 lines | yes | in the device menu the account fields are “user ID” and “account” |
| QIPP-100 / QIPP-100P | 128×48 mono, 2 lines | on QIPP-100P | the entry-level QIPP line, same web interface |
| QIPP-225PG / QIPP-300PG / QIPP-401PG | 320×240 colour, 4–6 lines | yes | gigabit ports |
| QIPP-425PG / QIPP-475PG | 3.5″ 320×240 colour, 12 lines | yes | the QIPP-475PG ships with a cordless handset |
| QIPP-800PG V2 / QIPP-1000PG | 4.3″ 480×272 colour, 20 lines | yes | the QIPP-EXT expansion module fits the QIPP-800PG V2 only |
| QWFP-1000-NV | 320×240, 2 lines | no | a Wi-Fi phone, joins the network without a cable |
QTECH also has a separate line of QVI gateways (QVI-2101…QVI-2172 for analogue phones, QVI-21xx FXO for analogue lines) and QPBX IP PBXs. Those are different devices with a web interface of their own, and this page does not cover them. The QVP-90/90P/90R models and the first-generation QIPP-300/400/500/800 series have been archived by the vendor, but their web interface is the same.
Frequently asked questions#
The admin password does not work — what now?#
It has already been changed (or the phone was configured by its previous owner). The factory password cannot be recovered and guessing is pointless — do a factory reset from the web interface. If the web password is unknown too, the remaining option is QTECH support.
Is a QTECH phone mandatory for a venue with a public contract?#
The “hardware from the Russian product register” requirement applies to the equipment purchase, not to our platform: the PBX works with any SIP phone. The QVP and QIPP series are in that register, which is why they get bought when a purchase follows those rules.
What is the difference between QVP and QIPP?#
They are two lines from the same vendor sharing one web interface: QVP are the classic office sets (2–8 lines), QIPP is the newer series with 12- and 20-line, touch and video models. Configuring an account is identical: the SIP accounts section, the same fields.
How many extensions fit into one phone?#
As many as the model has lines: two on the QVP-80P/95P/100/200/400PR, three on the QVP-300P, six on the QVP-500PR, eight on the QVP-600P, up to twenty on the larger QIPP models. Each account is configured separately (the account drop-down at the top of the page) and needs its own login and password from the admin panel.
Can a fleet of phones be configured automatically?#
Not from our platform's side — it runs no provisioning server. The phones themselves do have the mechanism: Maintenance → Advanced settings → Auto provision (a profile over FTP/TFTP/HTTP). If you run your own provisioning server, the parameters are described in the maintenance section of the QTECH manual.
Sources#
- QTECH QVP-100/QVP-100P user manual — https://files.qtech.ru/upload/voip/QVP-100_QVP-100P/QVP-100_QVP-100P_user_manual.pdf
- QTECH QVP-300P user manual — https://files.qtech.ru/upload/voip/QVP-300P/QVP-300P_user_manual.pdf
- QTECH QVP-600P user manual — https://files.qtech.ru/upload/voip/QVP-600P/QVP-600P_user_manual.pdf
- Line-up and specifications — the vendor catalogue: https://www.qtech.ru/catalog/voip/ip_phones/