Avaya J100 — setup for our PBX
Avaya J100 phones (J129, J139, J159, J169, J179, J189) run in two entirely different modes: with Avaya's own Aura system, and in Open SIP mode with any ordinary SIP PBX, ours included. The firmware is the same; only the configuration differs, and that is exactly what Avaya's official guide “Installing and Administering Avaya J100 Series SIP IP Phones in Open SIP” describes.
There are two ways to configure the phone: from its keypad (Main Menu → Administration, access code 27238) or through the phone's web interface. Below is the web interface — everything you need sits on a single tab there.
⚠️ Avaya has two quirks that make a phone “refuse to register for no reason”: the UDP transport is disallowed from the factory, and the Authentication User ID field is hidden. Both switches are in step 3 — do not skip them.
Shared credentials, network requirements and when a phone has to be reset are on the overview page SIP phone setup.
What you need#
- The extension credentials from the admin panel: Admin panel → Telephony → Staff & groups → “Reset password” — the “Extension credentials” dialog (details).
- The phone cabled into the same network as your computer. Power comes from PoE (802.3af) or a separate power supply.
- The administration menu access code —
27238from the factory. On a new phone that is what it is. - A computer with a browser in the same network.
Step 1. Find the phone's IP address#
The phone picks up an address over DHCP by itself. There are two ways to read it:
- Quickly, without a password: Main Menu → Network Information — the section shows the phone's network settings.
- Through the administration menu: Main Menu → Administration → type
27238into the Access code field → Enter → IP Configuration → Ethernet IPv4 → the Phone line: the IP address is next to it.
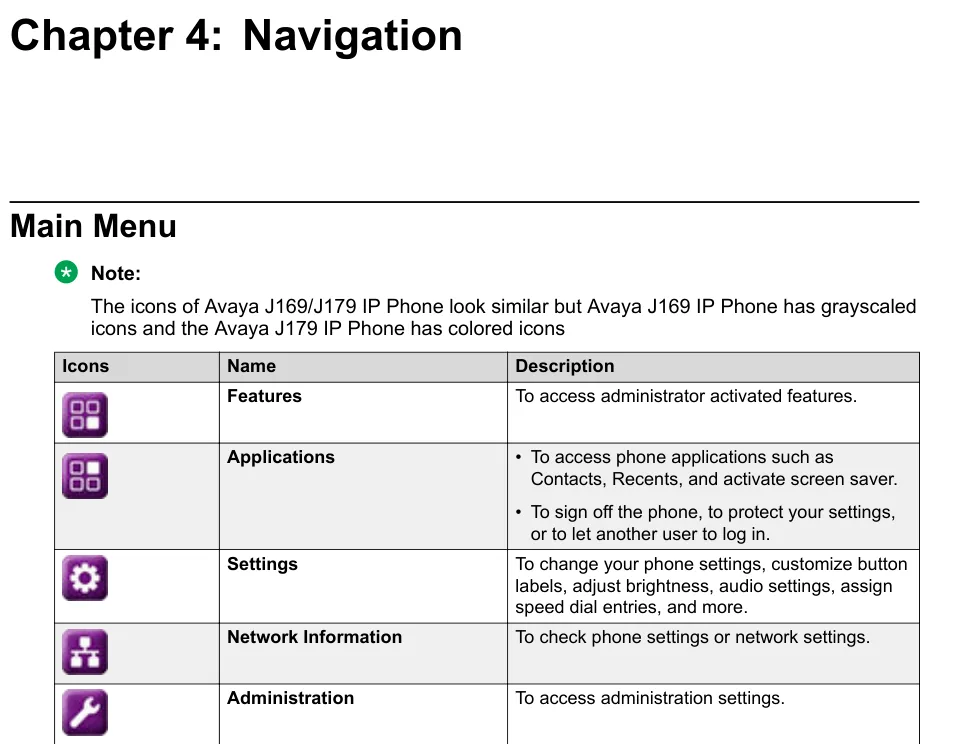 Screenshot: Using Avaya J169/J179 IP Phone SIP in third-party call control setup, Release 2.0 Issue 2, May 2018, page 19.
The same Ethernet IPv4 screen is where you turn Use DHCP off and enter a static address if you need one.
Step 2. Log in to the web interface#
| Factory value | |
|---|---|
| Address | http://<phone IP> |
| Login | admin (cannot be changed) |
| Password | 27238 — the same code as the administration menu |
On the first login the phone insists on a new password: 8 to 31 characters with at least one digit, one letter and one special character. Decide on it in advance and write it down — it cannot be recovered.
The login page does not open? Then the phone's web server is off. Turn it on from the keypad: Main Menu → Administration → code 27238 → Web server → Web on HTTP → Toggle to Yes → Save.
The password is rejected (the phone came second-hand)? Only a factory reset helps.
Step 3. Enter the PBX credentials#
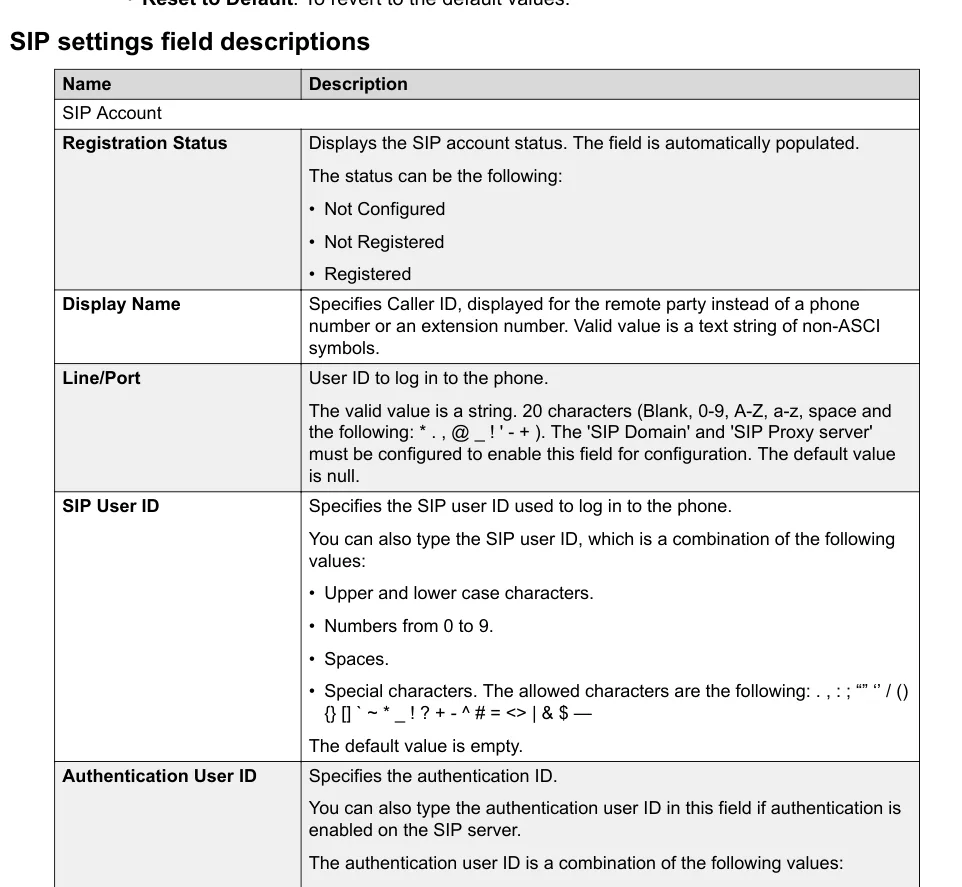
In the web interface pick SIP on the left. Start with two switches in the SIP Global Settings block — nothing works without them:
- UDP Transport → Allow (the factory value is Do Not Allow, and the phone simply never tries UDP).
- Authentication User-ID Field → Enabled (the factory value is Disabled, and the authentication login field stays hidden).
- Proxy Policy → Manual (Use Phone Admin Menu or WEB to configure) — otherwise the server address field is read-only.
Then fill in the fields:
| In the admin panel (“Extension credentials”) | On the phone (SIP tab) |
|---|---|
| SIP server | SIP Proxy Server — as the string server:5060;transport=udp, and the same host in SIP Domain |
| Login | SIP User ID — and the same value in Authentication User ID |
| Password | Authentication Password |
Port 5060 |
part of the SIP Proxy Server string: :5060 |
Transport UDP |
transport=udp in the same string, plus UDP Transport: Allow |
| Extension number | Display Name — the line label on the screen |
One more switch is mandatory: Avaya environment → Off (in the phone menu it is under Administration → SIP → SIP global settings). Left at Auto, the phone looks for an Avaya Aura system and behaves differently from what an ordinary PBX expects.
Click Save.
 Screenshot: Installing and Administering Avaya J100 Series SIP IP Phones in Open SIP, R4.0.11, February 2022, page 144.
The same from the phone keypad, without a browser
Main Menu → Administration → code 27238 → Enter → SIP:
- SIP global settings — SIP domain (our PBX address), Avaya environment = Off, SIP proxy policy = Manual;
- SIP proxy list → Select → SIP proxy (the PBX address), Protocol = UDP, SIP Port =
5060→ Save.
For the UDP protocol to be selectable in that menu the ENABLE_UDP_TRANSPORT parameter has to be on — the easiest way is to set it in advance in the web interface (UDP Transport: Allow).
Optional: codecs, DTMF, time, provisioning
- Codecs and DTMF — on the same SIP tab, the Codecs and DTMF and Codec Priority blocks. We need G.711 A-law, G.711 µ-law and G.722; DTMF is RFC 2833.
- Re-registration interval — Registration Interval; the factory 900 seconds need no change.
- Fleet provisioning — Avaya phones are configured from a
46xxsettings.txtfile on your file server (parametersSIP_CONTROLLER_LIST,SIPDOMAIN,ENABLE_UDP_TRANSPORT). The platform runs no provisioning server of its own — this is for a server you host. - Time — the phone takes time over NTP; the time zone is set in the phone settings, otherwise the call history shows someone else's time.
Step 4. Check the registration#
- In the phone web interface: on the SIP tab, the very first field Registration Status fills itself in and shows Registered, Not Registered or Not Configured.
- On the phone: after a successful login the Log In screen disappears and the normal home screen with the line label shows up.
- In the admin panel: Telephony → Staff & groups — the operator gets a green dot and a line with the name the phone reported. It refreshes no more than once a minute.
- A test call: dial a colleague's extension.
Audio quality — the *43 echo test. The green dot only speaks about registration: the voice travels as a separate stream and breaks separately. Dial *43 on the phone and press Send / OK (most devices do not start dialling on a star key by themselves). The PBX answers, plays a short beep after a second and then plays your own voice back to you — speak into the handset for about ten seconds and listen to yourself. You hear both the beep and yourself: audio flows both ways. Beep but no voice: audio does not reach the PBX from the phone (SIP ALG on the router is the usual culprit). Not even a beep: audio does not reach the phone from the PBX. All outcomes and the measured numbers (loss, jitter, latency) are covered in “Checking call quality”.
Factory reset#
A reset is needed on a second-hand unit (someone else's account and the previous owner's file server address are still inside), when the web interface password has been forgotten, and when the phone behaves unpredictably.
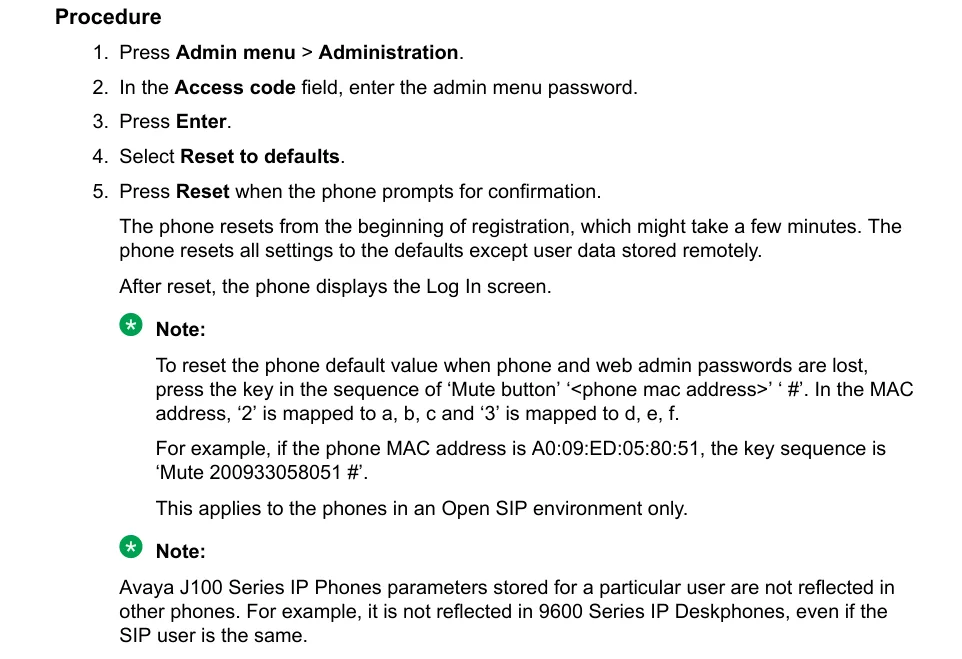
From the phone menu: Main Menu → Administration → the access code (27238 or yours) → Enter → Reset to defaults → Reset to confirm. The reset takes a few minutes, after which the phone shows the Log In screen.
If both the administration and the web passwords are lost, Avaya documents an emergency key sequence: press Mute, then dial the phone's MAC address as digits and #. Letters in the MAC address map to keypad digits: a, b, c → 2; d, e, f → 3. The example from the guide: MAC A0:09:ED:05:80:51 is dialled as Mute 200933058051 #. The MAC is printed on the label under the unit. The sequence works only on phones in Open SIP mode.
From the web interface: Reset to Default in the left menu → OK in the confirmation window. The phone restarts and returns every parameter to its factory value, provided it is not on a call at that moment.
 Screenshot: Installing and Administering Avaya J100 Series SIP IP Phones in Open SIP, R4.0.11, February 2022, page 114.
What is erased: the SIP account, the network settings, the administration and web passwords (back to 27238), the language and the user settings. The firmware stays. After the reset the phone is set up again from step 1.
If the phone does not register#
- UDP is disallowed. The most common cause on Avaya specifically: SIP → SIP Global Settings → UDP Transport is still at the factory Do Not Allow. Set it to Allow.
- The server string has no transport. Without
;transport=udpthe phone tries TLS on port 5061 — our PBX does not answer there. - The Authentication User ID field is empty or hidden. Set Authentication User-ID Field: Enabled and put the same long login into it.
- The login is not entered in full. It has to be
sip-xxxxxxxx-<extension>, not the short extension number. - Avaya environment is at Auto. For an ordinary PBX it has to be Off.
- Proxy Policy is Automatic. Then the phone takes the server address from the
46xxsettings.txtfile and ignores what you typed. It has to be Manual. - The password is stale — someone pressed “Reset password” in the admin panel. Issue a new one.
- The phone is in Avaya Aura mode. If the login screen asks for an extension and a “corporate network” password and there are no Open SIP items in the menu, the unit carries Aura firmware. It needs the Open SIP build; check the version under Main Menu → About.
- The network. The router blocks UDP 5060, SIP ALG is on, the phone sits in the guest Wi-Fi — see the overview.
Still stuck — or the phone is registered but there is no audio, calls drop after 30 seconds, incoming calls do not arrive? Troubleshooting by symptom — “Phone not working”; on-screen messages and error codes — “Not registering: error codes”.
Models in this family#
| Model | Screen / lines | PoE | Setup specifics |
|---|---|---|---|
| J129 | monochrome 2.3″, 1 line | 802.3af | the simplest unit in the series; same setup |
| J139 | colour 2.8″, 4 lines | 802.3af | — |
| J159 | two colour screens, 4 lines (+8 labels) | 802.3af | — |
| J169 | greyscale 3.5″, 4 lines | 802.3af | up to 3 expansion modules |
| J179 | colour 3.5″, 4 lines | 802.3af | Wi-Fi/Bluetooth via a separate J100 Wireless module |
| J189 | two colour screens, 8 lines (+48 labels) | 802.3at | — |
The number of lines is how many calls the phone shows at once; in the web interface that is Number of Line Appearances (factory value 3).
Older Avaya series: 96x1 and 16xx
- 9601, 9608/9608G, 9611G, 9621G, 9641G/9641GS. These units do have SIP firmware, but Avaya publishes no separate “in Open SIP” guide for them: their SIP documentation is written around Avaya Aura. We have not tested a 96x1 registering to our PBX — ⚠️ verify. If you own one, start by checking the firmware type and version under About (H.323 or SIP).
- 1603, 1608, 1616. The 16xx line shipped with H.323 firmware; Avaya does not document a SIP variant against an ordinary PBX — ⚠️ verify.
Both series are discontinued. If you are still choosing a phone, take a J100: it has the official Open SIP guide this page is written from.
Frequently asked questions#
Where does the password 27238 come from?#
It is Avaya's old “craft” code: on a phone keypad the digits 2-7-2-3-8 spell CRAFT. The same code opens the administration menu on the unit and the web interface on first login. Avaya recommends changing it — the web interface demands it by itself.
How does Open SIP mode differ from the normal one?#
In Avaya Aura mode the phone expects the vendor's own system: it receives settings, the directory and features from it over the PPM protocol. An ordinary SIP PBX cannot do that, so in the open mode the Avaya environment parameter goes to Off and the server address, login and password are entered by hand.
The phone shows a Log In screen and asks for a user name — what do I type?#
The login screen appears when the domain and the server address are set but there is no account. Fill it in from the web interface on the SIP tab (SIP User ID, Authentication User ID, Authentication Password) — the screen disappears by itself once registration succeeds.
Can I do without the web interface?#
Yes, everything is configurable from the keypad: Main Menu → Administration, code 27238, the SIP section. But allowing the UDP transport is easier in the web interface — the phone menu does not expose that parameter (ENABLE_UDP_TRANSPORT) as a separate item.
We have a dozen Avaya phones — configure each by hand?#
For a fleet, Avaya uses a 46xxsettings.txt file on your file server: it carries the PBX address, the domain and the UDP permission, and the phone fetches it at boot. The accounts still stay individual. The platform runs no provisioning server of its own.
Sources#
- Installing and Administering Avaya J100 Series SIP IP Phones in Open SIP, R4.0.11, February 2022 — https://support.avaya.com/css/public/documents/101053965
- Using Avaya J169/J179 IP Phone SIP in third-party call control setup, Release 2.0 Issue 2, May 2018 — https://support.avaya.com/css/public/documents/101047981
- Open questions: Avaya publishes no “Open SIP” guide for the 96x1 and 16xx series, and we have not tested those units registering to our PBX.