Door phones and door stations — setting up for our PBX
A door station at the staff entrance, an intercom at the delivery door, a panel at the car park gate — for our PBX all of these are an ordinary SIP subscriber: you create an extension (say “Staff entrance”), enter its credentials into the panel, and assign the call button a number to ring. From then on the courier presses the button, the manager's phone rings, and the door is opened with a code typed during the call.
There is one difference from a desk phone, and it matters: a door station has no screen, so its IP address is found not through a menu but by voice or with the vendor's discovery utility. Everything else is the same web interface in a browser.
This page covers the three brands most common in our venues: the Fanvil i-series (budget, CIS and Türkiye), Akuvox (housing and offices) and 2N (Czech, corporate class, EU). The shared credentials and network requirements are on the overview page “Setting up SIP phones”.
What you will need#
- A dedicated extension for the door — create it as a workplace (“Staff entrance”, “Car park”) rather than on a live employee: the panel occupies the account permanently. Credentials — see “Credentials”.
- The panel wired into the staff network of the venue. Nearly every model is powered over PoE, through the same cable.
- A computer with a browser on the same network.
- The vendor's discovery utility if the panel has no keypad: Fanvil
iDoorPhoneNetworkScanner, Akuvox IP Scanner, 2N Network Scanner. - A decision on which extension the button should ring (reception, bar, security) and who opens the door.
Step 1. Find the IP address of the panel#
Out of the box all three brands take an address over DHCP. How to hear or see it:
Fanvil i-series. Press and hold the call (speed-dial) button for 3 seconds — no earlier than 30 seconds after power-up — wait for the short beep from the speaker and press the button once more within 5 seconds: the panel announces its address by voice. If the button is pressed three times instead, the panel first switches to dynamic mode (DHCP) and then announces the address. The alternative is the iDoorPhoneNetworkScanner.exe utility from the Fanvil site. The factory static address, if there is no DHCP on the network, is 192.168.1.128, web port 80.
Akuvox. Hold the call button for 5 seconds — the panel speaks its address. Or find it on the network with the Akuvox IP Scanner: it lists the IP, MAC, model and firmware version of every device on the same network.
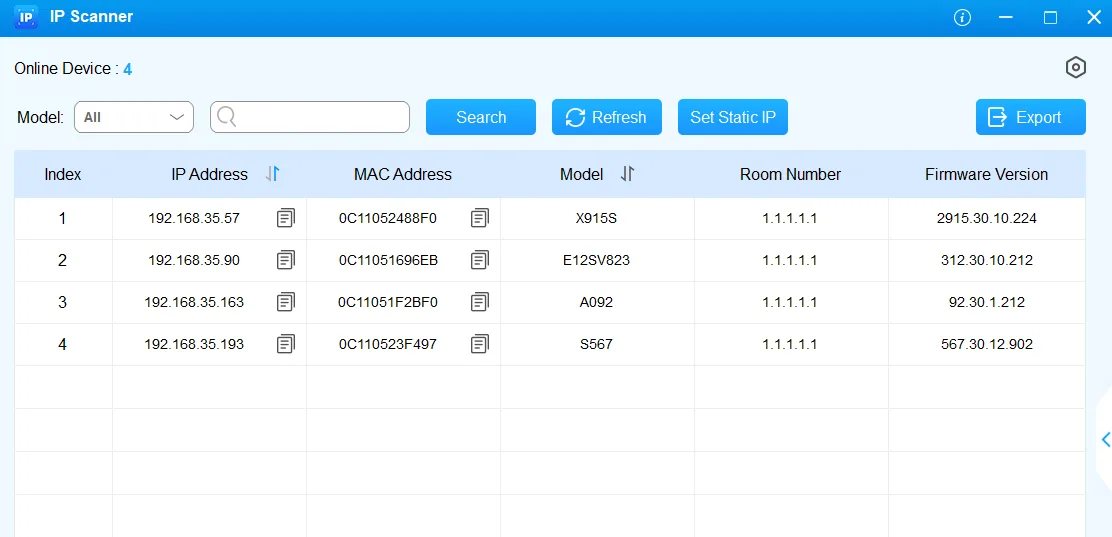 Screenshot: Akuvox R20A/B Door Phone Administrator Guide, “Access the Device”, knowledge.akuvox.com.
2N. Use the 2N Network Scanner or the button sequence from the installation manual of your model: on the 2N IP Vario, for example, wait for the second sound signal after power-up and press the quick-dial button five times — the panel reads its address aloud. An address of 0.0.0.0 means the DHCP server issued nothing. If there is no DHCP on the network, the panel can be switched to static mode with another button sequence (on three-button models, 1,1,1,2,2,3 within the first 30 seconds after the first signal), after which it is reachable at 192.168.1.100.
Step 2. Log in to the web interface#
Open http://<panel IP> in a browser:
| Brand | User name | Password | Note |
|---|---|---|---|
| Fanvil i-series | admin |
admin |
Case-sensitive |
| Akuvox | admin |
admin |
Case-sensitive; the vendor recommends Chrome |
| 2N | admin |
2n |
The password must be changed at first login: at least 8 characters with an upper-case letter, a lower-case letter and a digit |
Write the 2N password down straight away: it cannot be recovered, only reset together with the whole configuration. The Fanvil and Akuvox passwords are worth changing on day one too — the panel sits outdoors and its web interface is open to the entire venue network.
Step 3. Enter the PBX credentials#
The field names differ by brand; the meaning is the same.
Fanvil i-series: the Line → SIP page, line SIP 1.
| In the admin panel (“Extension credentials”) | In the Fanvil panel (Line → SIP) |
|---|---|
| SIP server | Server Address (the SIP Server 1 block) |
User name (sip-…-<extension>) |
Username and Authentication User — in full, in both fields |
| Password | Authentication Password |
Port 5060 |
Server Port |
Transport UDP |
Transport Protocol |
| Extension number | Display name |
| — | Activate — the checkbox must be ticked |
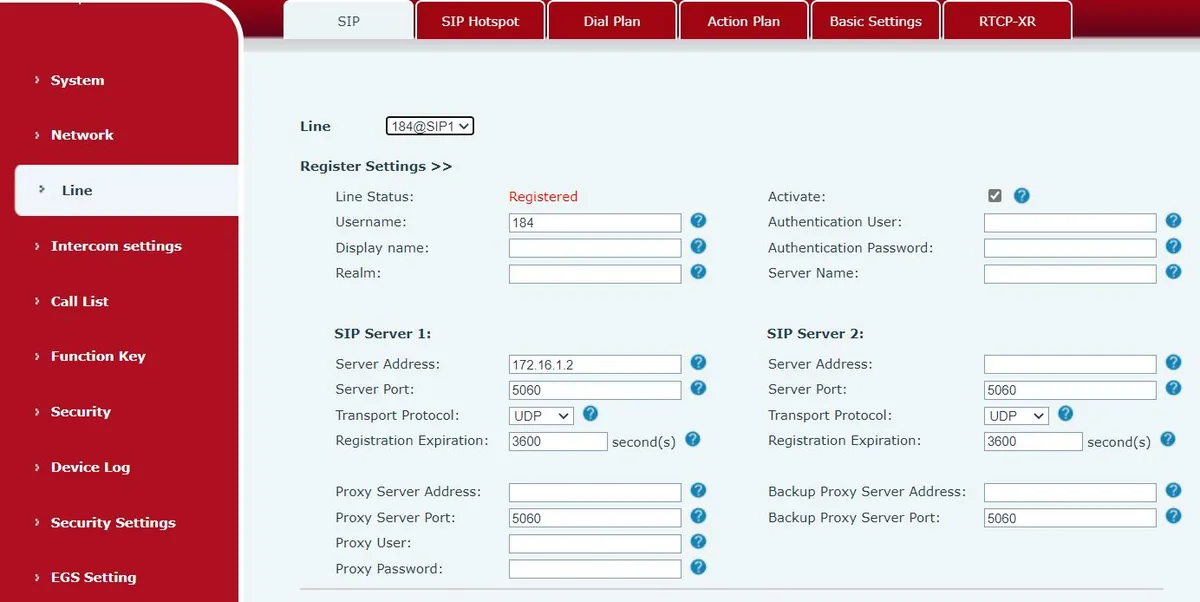 Screenshot: Fanvil i6X Series User Manual (i61/i62/i63/i64), p. 19.
Akuvox: the Account → Basic page, account Account 1 (the panel supports two independent accounts; the second is only needed for a backup server).
| In the admin panel | In the Akuvox panel (Account → Basic) |
|---|---|
| SIP server | Server IP in the SIP Server 1 block |
Port 5060 |
Port, same block |
User name (sip-…-<extension>) |
Register Name and Username — in full, in both fields |
| Password | Password |
| Extension number | Display Label and Display Name |
| — | Account Enabled — ticked |
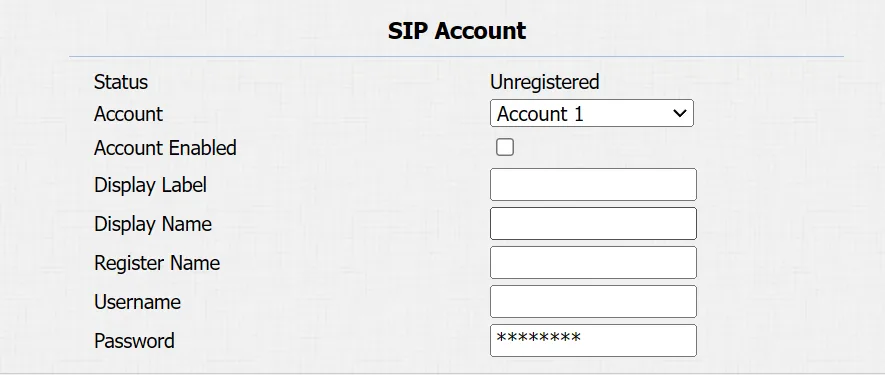 Screenshot: Akuvox R20A/B Door Phone Administrator Guide, “Intercom Call Configuration”, knowledge.akuvox.com.
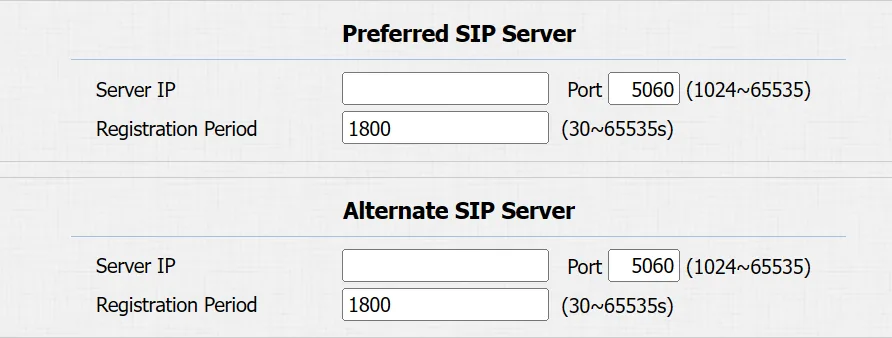 Screenshot: Akuvox R20A/B Door Phone Administrator Guide, “SIP Server Configuration”, knowledge.akuvox.com.
2N: the Services → Phone → SIP menu, account SIP 1 (2N has four).
| In the admin panel | In the 2N panel (Services → Phone → SIP) |
|---|---|
| SIP server | Domain, Proxy Address and Registrar Address — the same address in all three fields |
Port 5060 |
Proxy Port and Registrar Port |
User name (sip-…-<extension>) |
Phone Number (ID) and Authentication ID |
| Password | Password |
| Extension number | Display Name |
| — | SIP Account Enable and Registration Enabled — turn both on |
Save the settings (Apply / Save) — the panel goes out to register.
Optional: the call button, opening the door, codecs
Where the button rings. On Fanvil this is Function Key → Key 1, type Hot Key, value — the extension the call should go to. On Akuvox the number is set under Intercom → Basic for the corresponding button; on 2N it lives in the user list (Directory → Users), and the button is bound to a user under Hardware → Buttons.
A tip: point the button not at a specific person but at a ring group in our admin panel (Telephony → Ring groups). Then the set of people answering changes in a browser instead of with a screwdriver at the door.
How the door opens. The lock is driven by the panel's own relay; the platform does not control it. Four ways are used in practice: a code typed by the employee during the call (DTMF); a code on the panel keypad; an RFID card; an exit button inside.
- Fanvil i-series: the code rules live under EGS Setting → Password → Add password rule, type Remote for opening from a call and Local for the panel keypad. The factory remote code is
*, the factory local code is6789followed by#. Both must be replaced: the factory ones are all over the internet. - Akuvox: Intercom → Relay, the DTMF code and keypad code fields.
- 2N: Hardware → Switches → Switch 1: turn on Switch Enabled, set Controlled Output (the output the lock is wired to) and define the activation codes.
For a code typed during a call to reach the panel, the employee's phone must send DTMF RFC 2833 — that is our default.
Codecs. G.711 A-law, G.711 µ-law and G.722 are enough; on panels with a camera the video codec has no bearing on registration and is not passed to our PBX — the video is watched on the panel itself.
Auto-answer. Door stations usually enable auto-answer for incoming calls (Fanvil: Line → SIP → Basic Settings → Enable Auto Answering) so that security can “look in” on the entrance by calling the panel. Enable it deliberately: the device at the door starts listening to the area on a call.
Step 4. Check the registration#
- In the panel web interface: Fanvil shows Line Status = Registered (only refreshed with F5), Akuvox shows the Status field under Account → Basic, and 2N shows Registration State (
Registered) plus Failure Reason with the last server error if something is wrong. - In the admin panel (Telephony → Staff & groups) the door extension gets a green dot.
- A live check: press the button on the panel — the call must reach the assigned extension. Answer it and type the door code: a Fanvil panel confirms a correct code with a siren and a wrong one with a short beep; silence means the digits never reached it (check DTMF on the employee's phone).
Audio quality — the *43 echo test. On a panel with a keypad, dial *43 and press call: the PBX answers, plays a short beep and then echoes the audio back — speak at the panel for about ten seconds and listen to yourself from its speaker. That way one-way audio shows up before the first guest at the door runs into it: beep but no voice — the panel does not get audio through to the PBX (microphone, SIP ALG on the router); not even a beep — audio does not reach the panel. A single-button panel has no way to dial a code, so test it with its call button, and test the employee phone that answers it with the same *43 from that phone. Outcomes and numbers are covered in “Checking call quality”.
Factory reset#
A door station is exactly the case where a reset is almost always needed: the devices are often left by the fitters of the previous tenant, and inside there are foreign accounts, foreign door codes and the address of a foreign provisioning server.
Fanvil i-series. From the web interface: System → Configuration → Reset Phone → [Reset]. All settings, the database and the configuration files are erased and the device returns to the factory state (admin/admin, DHCP). If the web interface is unreachable and the address is unknown, first switch the panel to dynamic mode with three presses of the call button (see step 1) and log in at the announced address.
Akuvox. From the web interface: System → Upgrade, the reset button on that same page. The reboot and the reboot schedule live there too (System → Auto Provisioning).
2N. From the web interface: System → Maintenance → Reset Configuration — resets all parameters to factory values; resetting the network parameters and certificates needs an extra confirmation in the dialog. In hardware — a jumper or the Reset button inside the housing; the installation manual of your model says which. ⚠️ Both the hardware and the software reset delete the licence key of the panel if one was purchased: save the key before resetting.
What is erased on all three: SIP accounts, door codes, the card list, network settings, logs. The firmware stays. After a reset, start again from step 1: the address has to be discovered by voice or scanner once more.
If the panel does not register#
- The user name is not entered in full — it must be
sip-…-<extension>, not the short extension number. On Fanvil that is Username and Authentication User, on Akuvox Register Name and Username, on 2N Phone Number (ID) and Authentication ID. - The account is disabled:
Activate(Fanvil),Account Enabled(Akuvox),SIP Account EnableandRegistration Enabled(2N). Domainis empty on the 2N. The panel registers by the pair “number + domain”; when no SIP proxy is used, the server address goes there — for us, the PBX address from the credentials dialog.- The password is stale — somebody pressed “Reset password” in the admin panel. Issue a new one.
- The transport is not UDP — a second-hand panel often keeps TCP or TLS from the previous system.
- The panel has not booted yet. After power-up the device needs about 30 seconds before it answers on the network.
- The address has changed. A screenless panel is easily “lost” after a router reboot: DHCP handed out a different address. Reserve the address by MAC on the router, or set a static one.
- The settings “come back on their own” — the previous fitter's provisioning is running: do a full reset.
The generic network causes (ports, SIP ALG, Wi-Fi client isolation) are listed in “If it does not register” on the overview page.
Still stuck — or the phone is registered but there is no audio, calls drop after 30 seconds, incoming calls do not arrive? Troubleshooting by symptom — “Phone not working”; on-screen messages and error codes — “Not registering: error codes”.
Models in the family#
| Model | Screen / lines | PoE | Setup specifics |
|---|---|---|---|
| Fanvil i10 / i10S / i10SV / i10SD | No screen, one button, camera on the SV; 2 SIP lines | Yes | Address by voice from the call button or via iDoorPhoneNetworkScanner; the web interface matches the Fanvil desk phones |
| Fanvil i16S / i16SV / i18S | No screen, audio and video variants | Yes | Same menu; the i18S is discontinued but still around |
| Fanvil i30 / i31 / i32V / i33V | Panel with a camera, keypad on some models | Yes | On models with a keypad the address is announced by holding # for 3 seconds |
| Fanvil i61 / i62 / i63 / i64 | Video panel, keypad and card reader (i64) | Yes | Only the i64 supports a local keypad code; codes live under EGS Setting → Password |
| Fanvil i51W / i52W / i53W / i56A ⚠️ verify | Indoor units and higher-series panels | Yes | The vendor publishes their documents separately — check the manual of the exact model |
| Akuvox R20A / R20B / R20K | One button (keypad on the R20K), camera; 2 SIP accounts | Yes | Address by holding the button for 5 s or via the Akuvox IP Scanner |
| Akuvox R25 / R26 / R27 / R28 / R29 | Panels with keypad and card reader, the R29 with a touch screen | Yes | The same web interface; the R29 adds on-screen settings |
| Akuvox E11 / E12 / E16 / E18 | Compact video panels for flats and small entrances | Yes | The same Account → Basic and Intercom → Relay pages |
| Akuvox A01 / A02 / A05 | Access controllers (no call, just lock and cards) | Yes | A SIP account is not always needed: if the panel is not meant to call anyone, step 3 can be skipped |
| 2N IP Verso / Solo / Base / Force / Vario / Style | Modular corporate-class panels, up to 4 SIP accounts | Yes | The password changes at first login; some features (video, integrations) are unlocked by a licence |
FAQ#
How do I find the IP address of a panel with no screen?#
All three brands can speak the address after a press of the call button: Fanvil — hold for 3 seconds plus one press within the next 5 seconds; Akuvox — hold for 5 seconds; 2N — the button sequence from the installation manual of the model (on the Vario, five presses after the second sound signal). The universal fallback is the discovery utility: iDoorPhoneNetworkScanner for Fanvil, IP Scanner for Akuvox, Network Scanner for 2N.
The door call should ring several phones at once#
Configure one extension on the panel and decide “who answers” on the PBX side: create a ring group in the admin panel and point the button at its number. Then the set of people answering is changed in a browser, without a trip to the door.
The door does not open with the code typed during a call#
Three causes, by frequency: the code is not defined as Remote (on Fanvil — EGS Setting → Password, rule type “Remote”); the employee's phone sends DTMF the wrong way — it must be RFC 2833; the code is typed before the call is really established. Fanvil confirms a correct code with a siren and a wrong one with a short beep; complete silence means the digits never reached the panel.
Can the door be opened from the admin panel?#
No. The panel is a self-contained device and the platform does not drive its relay. The door is opened with a code from the call, a card, or the exit button inside. Panels do have their own URL command for opening, but it may only be used inside the venue network — such a panel must never be exposed to the internet.
Do the factory door codes really have to be changed?#
Yes, on the very first day. The factory remote-open code on Fanvil is * and the local one is 6789; they are identical on every unit of the brand and published in the open manual. A panel with a factory code is a door that opens for anyone who knows the model.
The panel is outdoors — what about security?#
Change every password (web interface and door codes), do not forward the panel's ports to the internet, and keep it on the staff network rather than the guest Wi-Fi. If the panel came from a previous tenant, reset it to factory defaults before configuring: foreign access cards and foreign codes survive a plain edit of the fields.
Sources#
- Fanvil i6X Series User Manual (i61/i62/i63/i64) — https://www.fanvil.com/upload/files/20221011/1356rb4n8f.pdf
- Fanvil i10S/i10SV/i10SD User Manual — https://www.fanvil.com/upload/files/20211211/15268bp284.pdf
- Fanvil i31 IP Video Door Phone User Manual — https://download.fanvil.com/User%20Manual/En/I31/i31_IP%20Video%20Door%20Phone_User%20Mannal_English_20160217.pdf
- Akuvox R20A/B Door Phone Administrator Guide (“Access the Device”, “Intercom Call Configuration”, “System Reboot & Reset”) — https://knowledge.akuvox.com/docs/r20-door-phone-admin-guide
- Akuvox Knowledge Base — guides for every panel series: https://knowledge.akuvox.com/
- Configuration Manual for 2N IP intercoms, v3.x — https://wiki.2n.com/hip/conf/latest/en
- 2N IP intercoms — Express Wizard for Basic Settings (first login
admin/2n, SIP account) — https://wiki.2n.com/hip/conf/latest/en/2-expresni-pruvodce-zakladnim-nastavenim - 2N IP Vario Installation Manual, “Configuration” (getting the IP with the buttons, static mode) — https://wiki.2n.com/hipva/inst/latest/en/3-funkce-a-uziti/3-1-konfigurace