Flyingvoice FIP1x, P series and FTA adapters — setup for our PBX
Flyingvoice is a Chinese maker of affordable SIP phones with built-in Wi-Fi, so a handset can go where there is no Ethernet socket — the host stand, the manager's office, the kitchen. In venues you will most often meet the simple two-line FIP10/FIP11C and P10/P11, the wide-screen P20–P23 and the colour FIP13G/FIP14G/FIP15G Plus. A separate branch of the family are the adapters (ATA): FTA1101, FTA5102E2, G504/G508 — you plug an ordinary analogue phone into them and SIP goes out to the network.
All of these devices share one and the same web interface — the blue tabs Status · Network · SIP Account · Phone · Administration — so the steps below fit both a phone and an adapter; the differences are called out separately.
General credentials, ports and network rules are on the overview page “SIP phone setup”.
What you will need#
- Extension credentials from the admin panel: SIP server, extension number, login, password, port
5060, transportUDP. Where to get them — “Credentials” (Telephony → Staff & groups → “Reset password”). - The phone on the same network as your computer: a cable into the
WAN/Internetport (notPC), or Wi-Fi. - A computer with a browser on that same network.
- For the FTA/G50x adapters — an ordinary analogue phone plugged into the
FXSport (Phone,Tel): without it you cannot hear the voice menu. - Models without a
P/Gin the name (FIP10, P11, P20) have no PoE — they need a power supply.
Step 1. Find out the phone's IP address#
The phone gets its address automatically over DHCP. You can see it on the device itself:
- Press the Menu key.
- Choose Status.
- Open the Network tab → the IPv4 line.
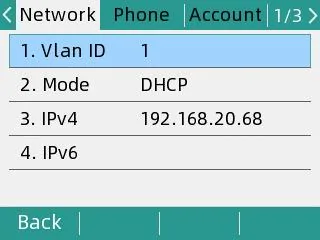 Screenshot: Flyingvoice P11S/P11U User Guide V1.3, p. 15.
Write down the address — something like 192.168.20.68 — you will need it in step 2.
An FTA/G50x adapter has no screen, so it reads the address out loud:
- Pick up the analogue phone plugged into the
FXSport. - Dial
****(four asterisks) — the voice menu (IVR) starts: “1 WAN port configuration…”. - Press
2— the device announces the current IP address of the WAN port. - To quit, press
*.
Step 2. Log in to the web interface#
Open the address from step 1 in your browser — just http://<phone IP>, no port.
| Factory value | |
|---|---|
| Address | http://<phone IP> (port 80) |
| Login | admin |
| Password | admin |
The FTA adapters have two accounts: admin / admin is the administrator mode (all settings visible) and admin / user is the user mode, where the SIP server address and port cannot be changed. Configure the device in administrator mode.
If the password has been changed and nobody knows it, there is no way to recover it — only a factory reset helps.
Step 3. Enter the PBX credentials#
In the web interface open the SIP Account tab → the Line 1 sub-tab and fill in two blocks — Proxy and Registration and Subscriber Information:
| In the admin panel (“Extension credentials”) | In the phone (SIP Account → Line 1) |
|---|---|
| SIP server | Proxy Server |
| Login | Account (the authentication field) and Phone Number — put the whole sip-…-<extension> string into both fields |
| Password | Password |
Port 5060 |
Proxy Port |
Transport UDP |
Transport (the factory value is already UDP) |
| Extension number | Display Name — the line label on the screen |
First switch Basic Setup → Line Enable to Enable, otherwise the line will not register. Leave Outbound Server and Backup Outbound Server empty. Press Save & Apply at the bottom of the page — no reboot needed.
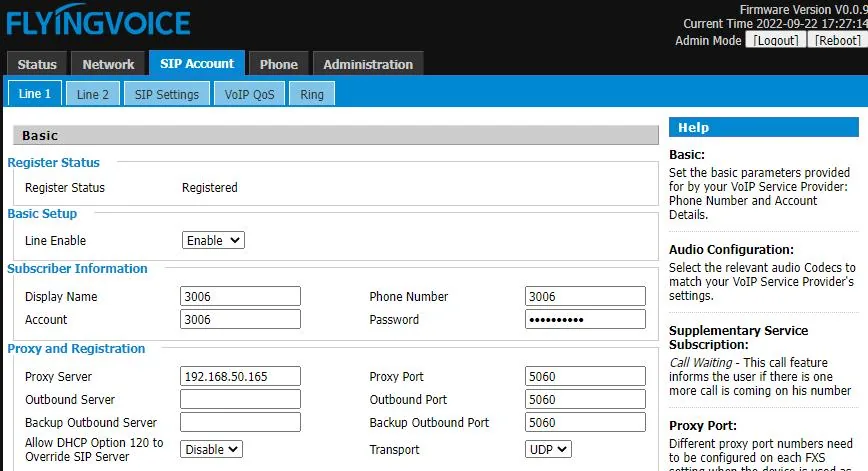 Screenshot: Flyingvoice P11S/P11U User Guide V1.3, p. 17.
On the FTA adapters the page has the same name; only the Proxy and Registration block sits above Subscriber Information, and there is a separate line per FXS port (four on the G504, eight on the G508):
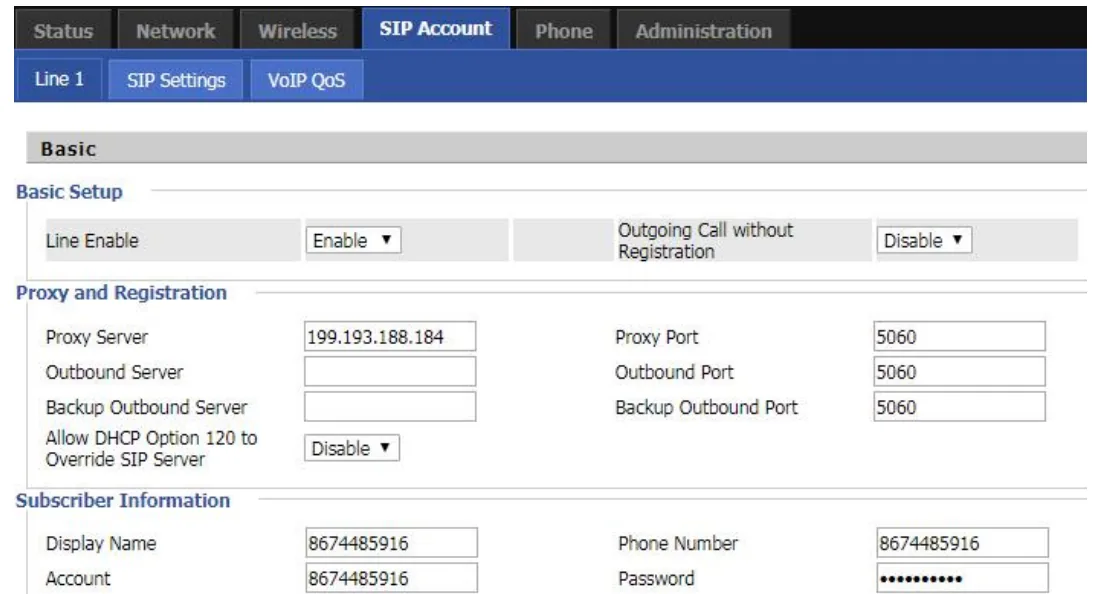 Screenshot: Flyingvoice FTA1101 Administrator Guide, SIP Account section (docs.flyingvoice.com/docs/fta).
If it is easier to type it on the phone itself, without a computer
- Menu → Advanced Settings (default password
admin) → Account. - Select Line 1 and press OK.
- Use the Switch key to set Registration to
Enable. - Fill in the fields: Display Name — the extension number, Register Name and User Name — the whole
sip-…-<extension>login, Password — the password, SIP Server — the PBX address, SIP Port —5060. - Press OK to save.
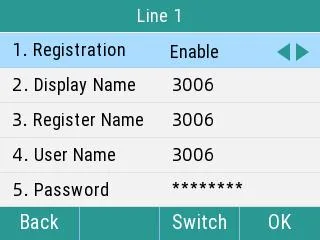 Screenshot: Flyingvoice P11S/P11U User Guide V1.3, p. 16.
Optional: codecs, DTMF, time
- Codecs —
SIP Account → Line 1 → Audio Configuration. Keep G.711A, G.711U and G.722 on top; G.729, G.723, iLBC and OPUS are not needed for our PBX. - DTMF —
SIP Account → Line 1 → Advanced → SIP Advanced Setup → DTMF Type. The factory value is RFC2833, which is exactly what we need; leave it alone. - Encryption — do not turn on
SRTPand do not pick theTLStransport: the platform does not offer them and the phone will stop registering. - Time —
Administration → NTP Settings: set the venue's time zone, otherwise the call history on the phone will be shifted. - Web access —
Administration → Management → Administrator Settings: the same place changes the password (Password Reset, user typeAdmin User) and the web port.
Step 4. Check the registration#
- On the phone: the SIP Account → Line 1 tab, the Register Status line at the top of the page should read
Registered. On the device screen the line name appears instead of a warning. - In the admin panel: Telephony → the Staff & groups tab — a green dot lights up next to the operator, together with the string the phone used to introduce itself. The status refreshes no more than once a minute, so give it time.
- A test call: dial a colleague's extension from the phone.
Audio quality — the *43 echo test. The green dot only speaks about registration: the voice travels as a separate stream and breaks separately. Dial *43 on the phone and press Send / OK (most devices do not start dialling on a star key by themselves). The PBX answers, plays a short beep after a second and then plays your own voice back to you — speak into the handset for about ten seconds and listen to yourself. You hear both the beep and yourself: audio flows both ways. Beep but no voice: audio does not reach the PBX from the phone (SIP ALG on the router is the usual culprit). Not even a beep: audio does not reach the phone from the PBX. All outcomes and the measured numbers (loss, jitter, latency) are covered in “Checking call quality”.
Factory reset#
A reset is needed if the phone was bought second-hand (it holds someone else's account and, worse, someone else's provisioning address that restores its own settings after every reboot), if the web password has been forgotten, or if the device behaves unpredictably.
From the phone:
- Menu → Advanced (default password
admin) → Reset to Factory Settings. - Choose Reset to Factory Settings → Reset.
- Answer OK to the phone's prompt — the reset starts.
From the web interface: Administration → Management → Factory Default → the Factory Default button.
On the FTA/G50x adapters there is neither screen nor menu: press and hold the Reset button on the case for 10 seconds.
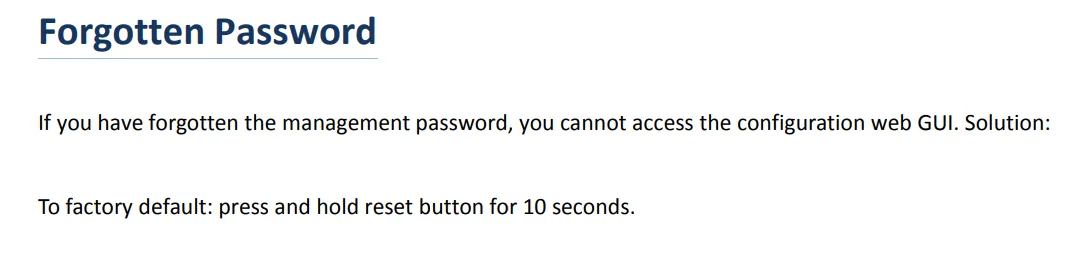 Screenshot: Flyingvoice FTA1101 Administrator Guide, Troubleshooting Guide → Forgotten Password.
The reset wipes the accounts, the network settings, the language, the directory and the call log; the firmware stays. It takes a few minutes — do not cut the power until the device has booted. Afterwards the phone is reachable again with admin/admin, takes its address over DHCP, and the setup starts from step 1.
If the phone does not register#
- The line is disabled.
SIP Account → Line 1 → Basic Setup → Line Enablemust beEnable. The most common reason for “nothing happens”. - The login is incomplete. You need
sip-…-<extension>, not the extension number alone, and in both fields —AccountandPhone Number. - The password is stale. Somebody pressed “Reset password” in the admin panel — issue a new one and type it again.
- Wrong transport or port.
Transportmust beUDP,Proxy Portmust be5060. ChoosingTLSproduces silence with no error message. - Outbound Server is filled in. If the previous provider's address is still there, the registration goes to the wrong place — clear the field.
- The phone got no IP. The IPv4 line on
Menu → Status → Networkis empty. For that case the Flyingvoice guide advises turning LLDP and CDP off in the network settings. - Someone else's provisioning. Settings “change by themselves” after a reboot — clear
Administration → Provisionand do a factory reset. - The venue network. SIP ALG on the router, a guest Wi-Fi with client isolation, UDP 5060 blocked — see the overview.
Still stuck — or the phone is registered but there is no audio, calls drop after 30 seconds, incoming calls do not arrive? Troubleshooting by symptom — “Phone not working”; on-screen messages and error codes — “Not registering: error codes”.
Models in the family#
| Model | Screen / lines | PoE | Setup specifics |
|---|---|---|---|
| FIP10 / FIP10P | 2.4″ mono, 2 lines | on FIP10P | 2.4 GHz Wi-Fi built in |
| FIP11C / FIP11CP | colour, 3 lines, 6 DSS | on FIP11CP | — |
| FIP12WP / FIP12WP-R | 3.5″ 192×64 mono, 2 lines, large keys | yes | “phone for seniors”: 3 photo keys |
| FIP13G | colour, 4 lines, 9 DSS | yes | gigabit ports |
| FIP14G | colour, 8 lines, 21 DSS | yes | gigabit ports |
| FIP15G Plus | touch screen, 10 lines | yes | 2.4/5 GHz Wi-Fi, Bluetooth |
| FIP16 Plus | portable with a belt clip, 2 lines | no (battery) | 2.4/5 GHz Wi-Fi only — for a cable-free network |
| P10 / P10P / P10G / P10W | 2.3″ 132×64 mono, 2 lines | on P10P/P10G | P10W — 2.4/5 GHz Wi-Fi |
| P11 / P11P / P11G / P11W | 2.4″ 320×240 colour, 2 lines | on P11P/P11G | P11W — 2.4/5 GHz Wi-Fi |
| P10S / P10U / P11S / P11U | like P10/P11, newer platform | yes | these models have their own guide (see “Sources”) |
| P20 / P20P / P20G | 2.3″ 132×64 mono, 2 lines | on P20P/P20G | — |
| P21 / P21P | 2.4″ 320×240 colour, 4 lines | on P21P | — |
| P22P / P22G | 3.5–3.8″ wide screen, 2 lines | yes | call recording to a USB stick |
| P23G / P23GW | 2.8″ 320×240, 8 lines | yes | P23GW — Wi-Fi; DECT headset support |
| FTA1101 | adapter, 1 FXS port | no | Wi-Fi and access-point mode; set up via the voice menu or http://192.168.1.1 from the LAN port |
| FTA5102E2 | adapter, 2 FXS ports | no | — |
| G504 / G508 | adapter, 4 / 8 FXS ports | no | one extension per port (Line 1…8) |
Two more Flyingvoice lines exist: the SAS gateways FTA5111/FTA5120 (they carry a small PBX of their own) and the multi-port FGW4148 with 16–48 FXS ports. They connect to our PBX with the same SIP Account fields, but we do not use their signature features (local SAS routing).
Frequently asked questions#
The device says FIP11C, but the guide is for the P11. Does it apply?#
Yes. The whole series — FIP1x, P1x and P2x alike — shares one web interface and one Flyingvoice administrator guide (see “Sources”); what differs is the number of lines, the screen and the keys. Menu paths, field names and the factory password are the same.
The phone is on Wi-Fi — is anything configured differently?#
No, the credentials are the same. Wi-Fi is set up separately (Network → WIFI in the web interface or Menu → Wi-Fi on the device); once connected, look up the address in the same place — Menu → Status → Network. Just keep in mind that a venue's guest network usually has client isolation on, so put the phone on the staff network.
How many extensions fit into one phone?#
As many as the model has lines: two on the FIP10/P10/P20, four on the FIP13G and P21, eight on the FIP14G and P23G, ten on the FIP15G Plus. Each line is configured on its own Line 1, Line 2 … sub-tab and needs its own login and password from the admin panel — do not duplicate one extension across two lines.
Two analogue phones are plugged into an adapter — do they need one extension or two?#
Two: on the FTA5102E2, G504 and G508 every FXS port is a separate line with its own account. Create as many operators as you have analogue sets and enter their credentials into Line 1, Line 2 and so on.
Can a fleet of phones be configured automatically?#
Not from our platform's side — it runs no provisioning server. The phones themselves do have the mechanism (Administration → Provision, plus the vendor's own FACS/FDC): if you run your own provisioning server, the parameter names (DBID_SIP_ACCOUNT, DBID_SIP_PASSWORD, DBID_DNSSRV_DOMAIN, DBID_SIP_OUTBOUND_PORT, DBID_SIP_TRANSPORT) are listed in the administrator guide.
Sources#
- Flyingvoice SIP-FIP1X Series / P1X Series / P2X Series IP Phones Administrator Guide (online manual, revision of 2026-09-03) — https://docs.flyingvoice.com:9443/docs/dgadadw
- Flyingvoice P11S / P11U User Guide V1.3 (2026-07-13) — https://www.flyingvoice.com/Uploads/Temp/downloads/20260715/Flyingvoice_P11S-P11U_user_guide_V1.3_20260713.pdf
- Flyingvoice FTA1101 Administrator Guide (online manual, revision of 2025-05-27) — https://docs.flyingvoice.com:9443/docs/fta
- Flyingvoice ATA Administrator Guide (FTA5111 and the FXS/FXO series) — https://docs.flyingvoice.com:9443/docs/abc
- Model specifications — the vendor catalogue: https://www.flyingvoice.com/products/FIP1X.html, https://www.flyingvoice.com/products/P1X.html, https://www.flyingvoice.com/products/P2x.html, https://www.flyingvoice.com/products/ATA.html