Htek UC9xx / UC8xx — setup for our PBX
Htek (a brand of Nanjing Hanlong Technology) makes inexpensive desk IP phones that turn up a lot in cafés, hotels and warehouses: from the single-line UC902 to the UC926 with a colour screen and a gigabit port. Every phone in the UC9 range shares one web interface, so this page fits any of them.
One Htek quirk: the setup is split across two screens — Profile (what the PBX is: server address, transport — filled in once) and Account (who is on that PBX: login, password, number). Fill in only one of them and the phone will not register.
Common credentials, ports and network requirements are on the overview page “SIP phone setup”.
What you need#
- Extension credentials from the admin panel: Admin panel → Telephony → Staff & groups tab → “Reset password” on the operator (how to get them).
- The phone connected by cable to the same network as your computer. Most models take PoE (802.3af); builds without a P in the name need a power adapter.
- A computer with a browser on the same network.
Step 1. Find the phone's IP address#
The quickest way: press the OK key while the phone is idle — the current IP address, MAC address and firmware version appear on the display.
For more detail, use the menu: Menu → Status → Network → IPV4. It also shows whether the address came from DHCP (WAN Type: DHCP mode) or was set by hand.
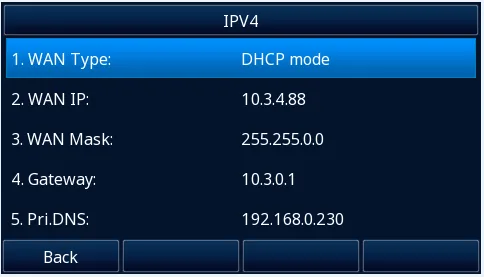 Screenshot: Htek UC9 Series IP Phone User Guide, p. 35.
Menu → Status → Accounts shows whether the line is registered — you will need it in step 4.
Step 2. Log in to the web interface#
Type the phone's address into your browser: http://<phone IP>.
| Factory value | |
|---|---|
| Address | http://<phone IP> |
| Username | admin |
| Password | admin |
| Restricted account | user / 1234 |
| Phone menu password (Advanced Setting) | admin |
On the first login the phone warns that the factory password is in use — both on its own display and in the browser. Change the administrator password and write the new one down: it cannot be recovered, only reset together with the phone.
The computer and the phone must be on the same subnet, otherwise the page simply will not open.
Step 3. Enter the PBX credentials#
3.1. The PBX profile (once)#
Open Profile → Basic, pick Profile 1 in the Profile list and fill in:
| In the admin panel (“Extension credentials”) | On the phone (Profile → Basic) |
|---|---|
| SIP server | Primary SIP Server |
Port 5060 |
the factory value; if your PBX uses another port it is written after a colon: server:5090 |
Transport UDP |
SIP Transport → UDP |
Leave DHCP SIP Server set to No. Click the save button at the bottom of the page.
3.2. The staff account#
Open Account → Basic, pick a free row (Account 1) in the Account list and fill in:
| In the admin panel (“Extension credentials”) | On the phone (Account → Basic) |
|---|---|
| — | Account Active → Yes |
| — | Profile → the profile created in step 3.1 |
| Login | SIP User ID and Authenticate ID — the whole sip-…-<extension> string, in both fields |
| Password | Authenticate Password |
| Extension number | Label (the line caption on the screen) and Name (the name the called party sees) |
SIP server, port 5060, transport UDP |
already set by the profile from step 3.1 |
Fields marked with * are mandatory. Click SaveSet.
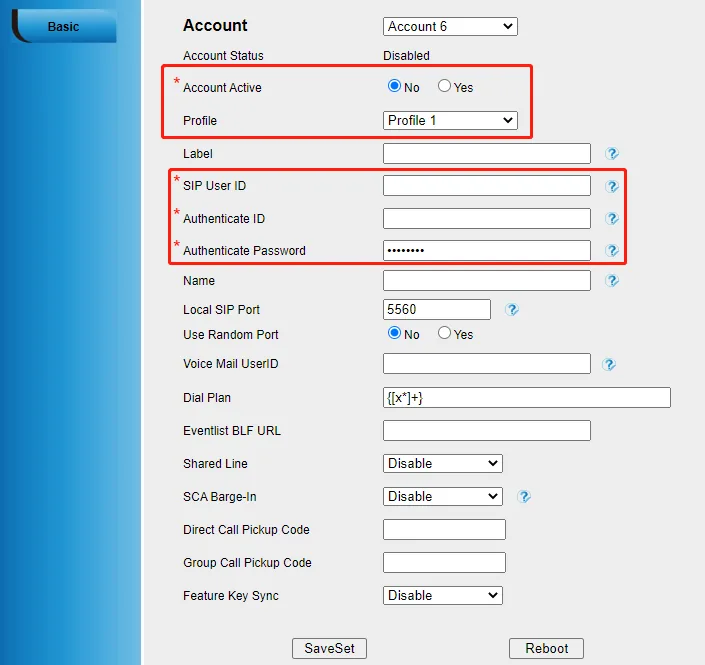 Screenshot: Htek UC9 Series IP Phone User Guide, p. 39.
Optional: codecs, time, language, setting up from the phone itself
- Codecs. Htek's factory codec order is PCMU (G.711 µ-law), PCMA (G.711 A-law), G.729A/B, G.726-32, G.723.1, G.722 — everything we need is already enabled and first in line. Nothing to change.
- Time. The phone syncs time over NTP automatically, but the time zone is better set by hand: Setting → Date & Time. Without it the call history shows the wrong time.
- Display language: Setting → Preference → LCD Language in the browser, or Menu → Setting → Basic Settings → Language on the phone itself.
- Setting up without a computer. The same account can be typed on the keypad: Menu → Settings → Advanced (password
admin) → Accounts → pick a line → Active: Enable, then Profile, SIP User ID, Authenticate ID, Password, Name → the Save soft key. The colon for a port is typed with the “1” key in ABC mode. It works, but typing a long login on a numeric keypad is slow — a browser is faster.
Step 4. Verify the registration#
- In the web interface: the Account Status field on Account → Basic states outright whether the line is registered. The start page gives the overall summary (Version, Account Status, Network).
- On the phone: Menu → Status → Accounts; on the home screen a registered line switches its icon to “Line (Registered)”.
- In the admin panel: Telephony → Staff & groups — a green dot lights up next to the operator, together with the string the phone used to identify itself. The status comes from the PBX and refreshes at most once a minute.
- A test call: dial a colleague's extension.
Audio quality — the *43 echo test. The green dot only speaks about registration: the voice travels as a separate stream and breaks separately. Dial *43 on the phone and press Send / OK (most devices do not start dialling on a star key by themselves). The PBX answers, plays a short beep after a second and then plays your own voice back to you — speak into the handset for about ten seconds and listen to yourself. You hear both the beep and yourself: audio flows both ways. Beep but no voice: audio does not reach the PBX from the phone (SIP ALG on the router is the usual culprit). Not even a beep: audio does not reach the phone from the PBX. All outcomes and the measured numbers (loss, jitter, latency) are covered in “Checking call quality”.
Factory reset#
A reset is needed if the phone was bought second-hand (it still holds someone else's account and, worse, someone else's provisioning address, which will overwrite your settings on every reboot), if the administrator password has been forgotten, or if the phone behaves unpredictably. Everything is erased: SIP accounts and profiles, network settings, passwords, the phone book, the call history, the language.
Method 1. From the phone. Menu → Settings → Advanced Setting (factory password admin) → Phone Setting → Factory Reset, then the OK soft key on the warning screen.
Method 2. From the web interface. Management → Upgrade → the Reset To Factory button → confirm.
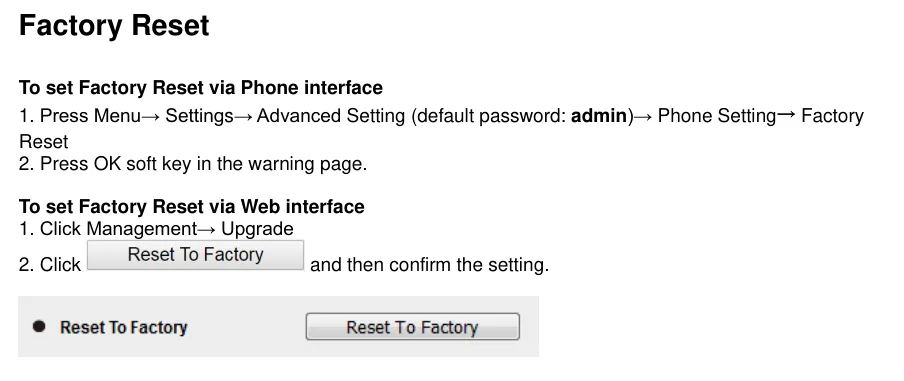 Screenshot: Htek UC9 Series IP Phone User Guide, p. 162.
After the reset. The phone reboots and takes an address over DHCP again — find it with the OK key (step 1). The administrator password is admin once more, and the phone will warn about the factory password again. The profile and the account have to be entered from scratch.
If the phone does not register#
- Only the Account or only the Profile is filled in. This is the most common Htek mistake: the PBX address lives in Profile → Basic while the login and password live in Account → Basic, and the account must point at the right Profile.
- Account Active is not set to Yes. The line is configured but switched off.
- The extension number was typed into the login field. SIP User ID and Authenticate ID must hold the whole
sip-xxxxxxxx-<extension>string, not “101”. - The password came from the wrong window. An extension password is shown once; if it was not saved, click “Reset password” in the admin panel and enter the new one.
- A port was appended to the server field incorrectly. Our PBX uses the standard
5060, so there is no need to append a port at all. - TLS is selected as the transport. Our PBX does not offer TLS/SRTP encryption: SIP Transport must be
UDP. - SIP ALG on the router. Registration works but the call drops or only one side is audible — switch SIP ALG off (details in the overview).
Still stuck — or the phone is registered but there is no audio, calls drop after 30 seconds, incoming calls do not arrive? Troubleshooting by symptom — “Phone not working”; on-screen messages and error codes — “Not registering: error codes”.
Models in this family#
| Model | Screen / lines | PoE | Setup differences |
|---|---|---|---|
| UC902 / UC902S / UC902P / UC902G / UC902E | monochrome, 2 SIP lines | on P builds; G — gigabit port, E — built-in 2.4 GHz Wi-Fi | the entry model, the steps on this page apply unchanged |
| UC903 | monochrome, 2 SIP lines | no | same steps |
| UC912 / UC912E / UC912G / UC912P | monochrome, 4 SIP lines | on the P build | same steps |
| UC921 / UC921U / UC921E / UC921G / UC921P | monochrome, 6 SIP lines | on the P build | same steps |
| UC923 / UC923U | monochrome, 6 SIP lines | yes | same steps; U supports the WFBT60 Wi-Fi dongle |
| UC924 / UC924U / UC924W / UC924E | colour, 6 SIP lines | yes | same steps; W/U add dual-band Wi-Fi |
| UC926 / UC926U / UC926S / UC926E | colour, 6 SIP lines, gigabit | yes | the flagship; same steps |
| UC842 / UC862, UC802 / UC803 / UC804 / UC806, UC840 / UC860 | monochrome, 2–6 lines | depends on the build | ⚠️ verify: discontinued and not covered by the current UC9 guide. The logic is the same (Profile + Account, admin/admin), but item names in the older web interface may differ — check the manual for your model in Htek's EOL section |
Frequently asked questions#
How does a Profile differ from an Account, and why are there two?#
A Profile describes the PBX: server address, transport, registration timers. An Account describes a person: login, password, number. One profile serves every account on the phone, so when the PBX address changes there is a single place to fix. If your venue has one PBX, Profile 1 is all you need.
Can several extensions be registered on one phone?#
Yes: the UC912 has four lines, the UC921/923/924/926 have six. Create Account 2, Account 3 and so on, pointing each at the same Profile 1 but with its own login and password. The lines are spread across the keys on the case.
The phone says the factory password is in use. Is that an error?#
No, it is Htek's standard warning: as long as the administrator password is still admin, it stays on both the phone's display and the web interface. Change the password in the settings and it disappears. It affects neither registration nor calls.
Does auto-provisioning work with your PBX?#
No, the platform has no provisioning server — the phone is configured by hand as described above. Htek itself does have a provisioning mechanism and operators use it: if a second-hand phone still holds someone else's provisioning address, your settings will be overwritten on every reboot. Start with a factory reset.
Does anything need changing in the codecs?#
No. Htek's factory set already starts with G.711 (PCMU/PCMA) and includes G.722 — exactly what our PBX uses.
Sources#
- Htek IP Phones Administrator Guide, version 2.42.6.5 — https://www.htek.com/wp-content/uploads/2025/10/Htek-UC9-Series-IP-Phone-Administrator-Guide.pdf (the model list — p. 14, showing the IP with the OK key and the factory
admin/admin— p. 17, the1234user password — p. 51, the codec table and its factory priority — p. 132) - Htek UC9 Series IP Phone User Guide — https://www.htek.com/wp-content/uploads/2025/10/Htek-UC9-Series-IP-Phone-User-Guide.pdf (the Menu → Status screens — pp. 34–36, registration via Profile → Basic and Account → Basic — pp. 37–40, the factory reset — p. 162)
- Htek support section — https://www.htek.com/all-support-phone/ (manuals and firmware by model, including the discontinued-products section)