Yealink W5x/W6x/W7x (DECT) — setting up for our PBX
A Yealink DECT kit is a base station (a palm-sized white box: W52B, W56B, W60B, W70B) plus handsets (W53H, W56H, W73H, W78H, and the rugged W59R). Venues put them where staff keep moving: the floor, the kitchen, the stockroom, a hotel front desk. Unlike a desk phone there are two different “connections” here, and they must not be confused:
- handset ↔ base — that is DECT radio. Our PBX has nothing to do with it;
- base ↔ PBX — that is a normal SIP registration. The extension credentials go into the base, through its web interface, and the handsets are then handed ready-made lines.
So the order is: pair the handsets with the base, enter the accounts into the base, then say which handset gets which line. Common credentials and network requirements are on the overview page “Setting up SIP phones”.
What you will need#
- The extension credentials from the admin panel: Admin panel → Telephony → Staff & groups tab → “Reset password” next to the operator. The “Extension credentials” window shows the SIP server, extension number, username, password, port and transport (details).
- The base plugged into the venue network with a cable: PoE (IEEE 802.3af) from a switch, or the supplied 5 V power adapter.
- A charged handset — without it you cannot learn the base IP address or reach the web interface.
- A computer on the same network as the base, with any browser.
Pairing the handsets with the base#
If you bought a complete kit (W53P, W56P, W73P, W76P, W79P are a base plus a handset in one box), the handset is paired at the factory and shows its number. If the handset says “Unregistered!”, pair it:
- Put the base into registration mode: press and hold the paging key on the base — the round button with the radio-wave icon — until the registration LED starts flashing. The mode switches itself off after about a minute and a half.
- On the handset press the Reg soft key.
- The screen shows “Handset Subscribed” and the base number — the last 4 characters of its MAC address.
The second way, if the handset offers no Reg key: OK → Settings → Registration → Register Handset, pick the base and enter the base system PIN — 0000 by default.
One W60B base holds up to 8 handsets, a W70B up to 10; the older W52P/W56P up to 5. One handset remembers up to 4 bases.
Step 1. Find the IP address of the base#
The base has no display, so the handset shows its address.
Press the paging key on the base. Every paired handset rings and shows the IP address of the base on its screen. Pressing it again (or any key on a handset) stops the ringing.
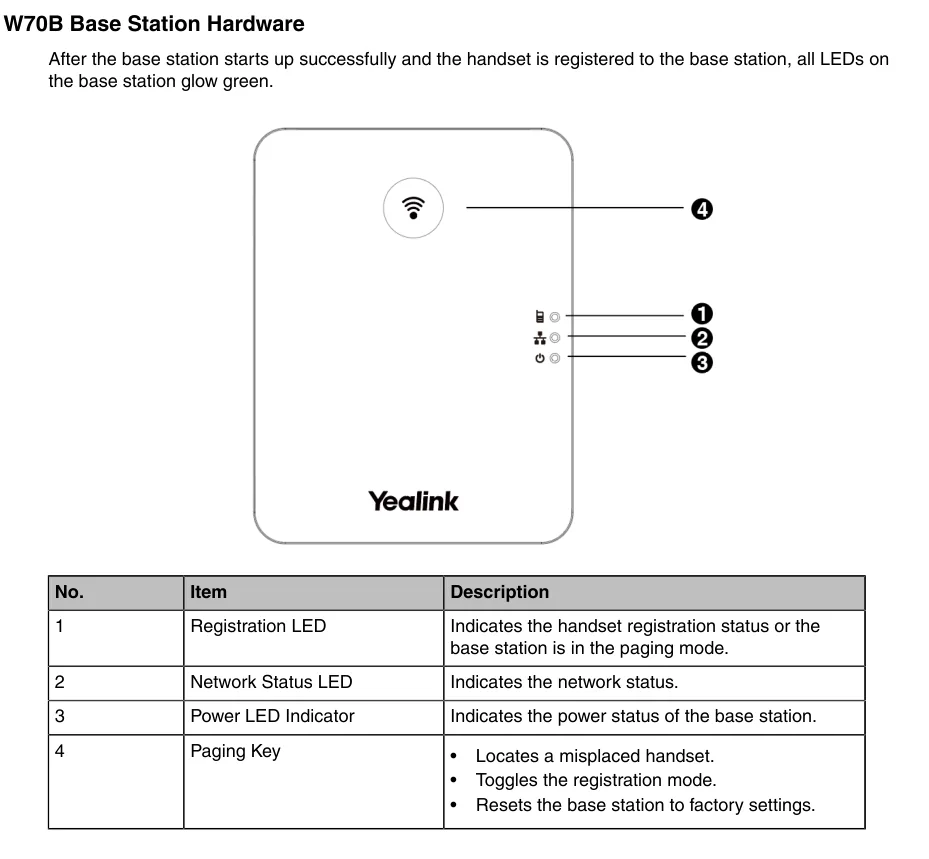 Screenshot: Yealink W70B DECT IP Phone User Guide V85.40, p. 8.
The same key does two more things — it toggles handset registration mode and, held down, resets the base to factory settings, so do not press it “just in case”.
Fallbacks:
- The base status screen on the handset: press OK, then Status → Base (on the CP930W — Menu → Status → Base Status, on the CP935W — More → Status → Base Status). The administrator guide points to exactly this path for finding the device address before logging in to the web interface. The Warning field there also tells you that the base still uses the factory password.
- The DHCP client list on your router — look for a device whose MAC starts with
80:5E:C0or00:15:65(Yealink).
Step 2. Log in to the web interface of the base#
Open http://<base IP> in a browser.
| Factory value | |
|---|---|
| Address | http://<base IP> (HTTPS is supported too) |
| Username | admin |
| Password | admin |
Both are case-sensitive. Change the password on first login — while the factory one is in place, the handsets show a warning on the base status screen.
If the password was changed and forgotten, it cannot be recovered — only a factory reset helps.
Step 3. Enter the PBX credentials#
In the web interface open Account → Register and pick a free account in the Account list at the top (Account 1, Account 2 … — the base holds several extensions at once).
| In the admin panel (“Extension credentials”) | In the Yealink base (Account → Register) |
|---|---|
| — | Line Active → Enabled |
| Extension number | Label and Display Name — the line caption on the handset screen |
Username (sip-…-<number>) |
Register Name and User Name — the same long string in both fields |
| Password | Password |
| SIP server | SIP Server 1 → Server Host |
Port 5060 |
SIP Server 1 → Port |
Transport UDP |
SIP Server 1 → Transport |
Leave the SIP Server 2 block empty and Enable Outbound Proxy Server disabled: we run no backup server, and a stray outbound proxy breaks registration. Leave NAT at Disabled — our PBX needs no STUN.
Click Confirm at the bottom of the page. A few seconds later Register Status at the top reads Registered.
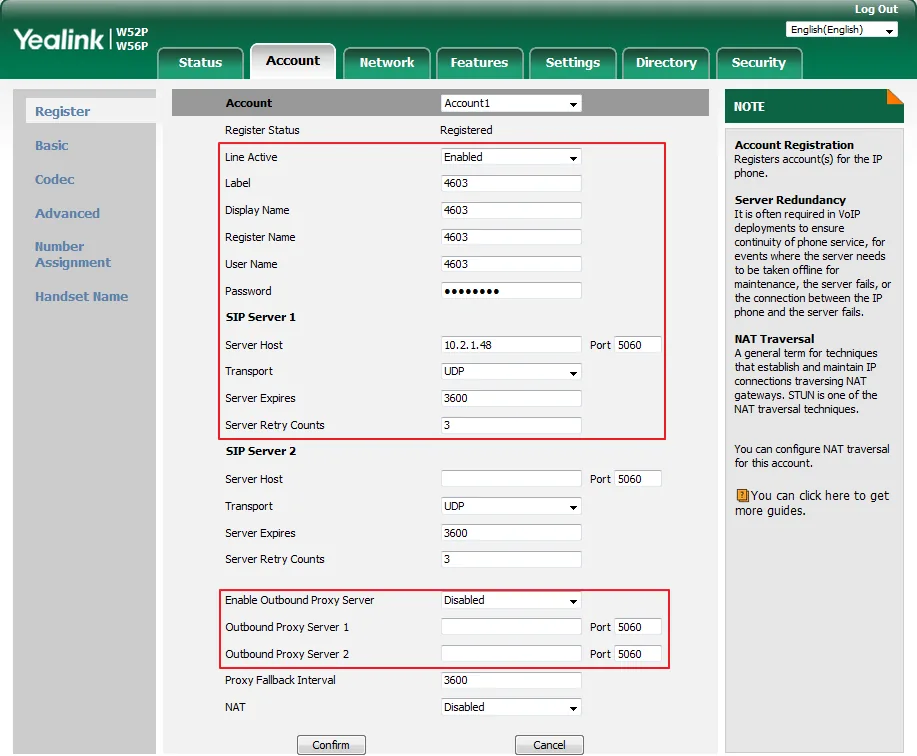 Screenshot: Yealink IP DECT Phone Administrator Guide V81.10, p. 167.
Optional: codecs, time, a second extension
- Codecs — Account → Codec: keep
PCMA(G.711 A-law),PCMU(G.711 µ-law) andG722, the rest can be removed from the enabled list. G.729 is not needed. - Time — Settings → Time & Date: the venue time zone and NTP. Without it the handset call log shows the wrong time.
- Several extensions on one base. Every next employee gets their own account in the Account list (Account 2, Account 3 …) with their own username and password from the admin panel. Do not try to “share” one extension between handsets — that is what line assignment in step 4 is for.
- The web interface language is switched with the drop-down in the top right corner of the page.
Fleet provisioning
The platform runs no provisioning server of its own — the base is configured with the fields above. If you run your own provisioning server, a Yealink base fetches y000000000025.cfg (shared across the DECT series) and <MAC>.cfg; the server address is set in Settings → Auto Provision or arrives over DHCP option 66. The account parameters in the file are account.X.register_name, account.X.user_name, account.X.password, account.X.sip_server.1.address, account.X.sip_server.1.port, account.X.sip_server.1.transport_type; line assignment is handset.X.incoming_lines and handset.X.dial_out_lines.
Step 4. Assign lines to the handsets and check the registration#
A registered account does not reach a handset by itself: the base decides separately which handset receives calls on which line and which line it calls from. Until that is done the handset stays silent on incoming calls and will not let you dial.
Open Account → Number Assignment:
- in the Incoming lines block tick which lines arrive at which handset (one line on several handsets — they all ring, one answers);
- in the Outgoing lines block tick which lines the handset calls from, and choose its default line in the Default column;
- click Confirm.
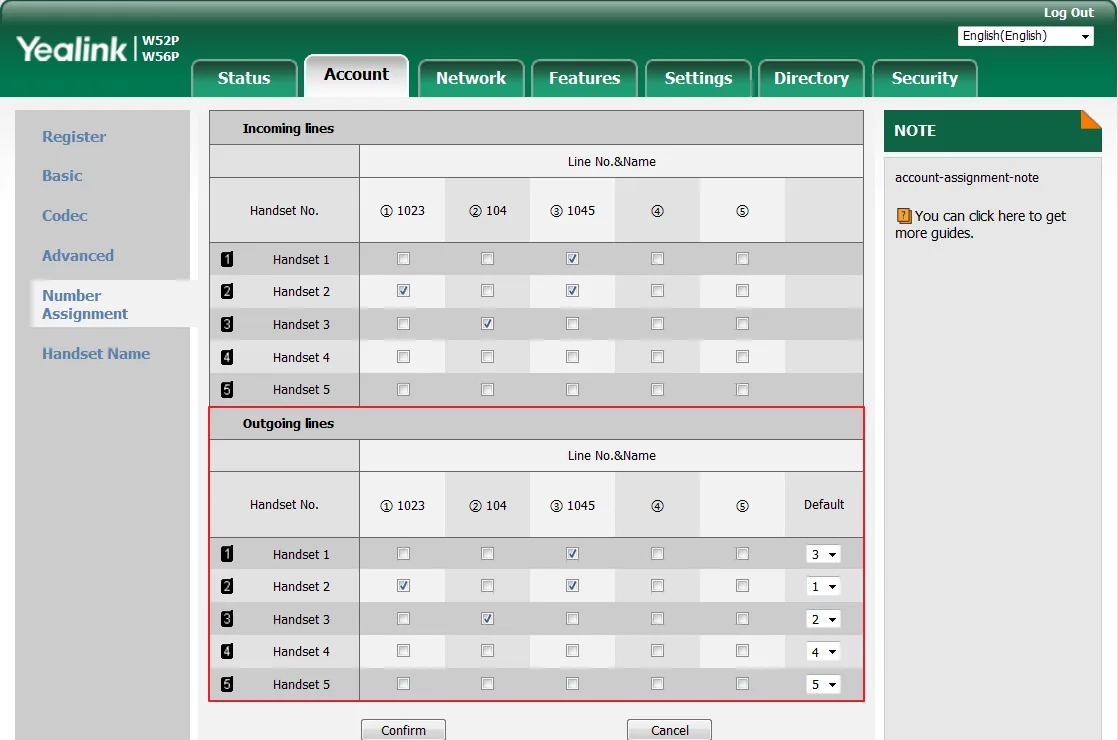 Screenshot: Yealink IP DECT Phone Administrator Guide V81.10, p. 176.
How to verify:
- On the base — web interface, Account → Register:
Register Status: Registered. - On the handset — OK → Status → Line Status: the list of lines with their state. Faster still: the Line soft key when idle shows the same list, with the default line first.
- In the admin panel — Telephony → Staff & groups: a green dot next to the operator and the string the base identified itself with (for example
Yealink W70B). The status refreshes no more than once a minute. - A test call to a colleague’s extension.
Audio quality and radio coverage — the *43 echo test. Dial *43 on the handset and press call: the PBX answers, plays a short beep and then plays your own voice back to you. On DECT this doubles as the only honest coverage test: without hanging up, walk the handset through the floor, the kitchen, the storeroom and the stairs and keep listening to yourself — wherever the echo starts to break up, hiss or drop out, a call with a guest will drop too. Beep but no voice: audio does not reach the PBX from the base (SIP ALG on the router); not even a beep: it does not reach the base from the PBX. Outcomes and numbers are covered in “Checking call quality”.
Factory reset#
A reset is needed if the base came from a previous operator (someone else’s accounts inside, and someone else’s provisioning address — it will restore its own settings on every reboot), if the administrator password is forgotten, or if the base behaves inexplicably.
From the handset (no computer required):
- OK → Settings → System Settings → Base Reset.
- Enter the base system PIN — 0000 by default — and press Done.
- Choose Reset to factory and answer Yes to “Reset base to factory configuration now?”.
From the web interface of the base: Settings → Upgrade → the Reset to factory button → OK on “Do you want to reset to factory?”.
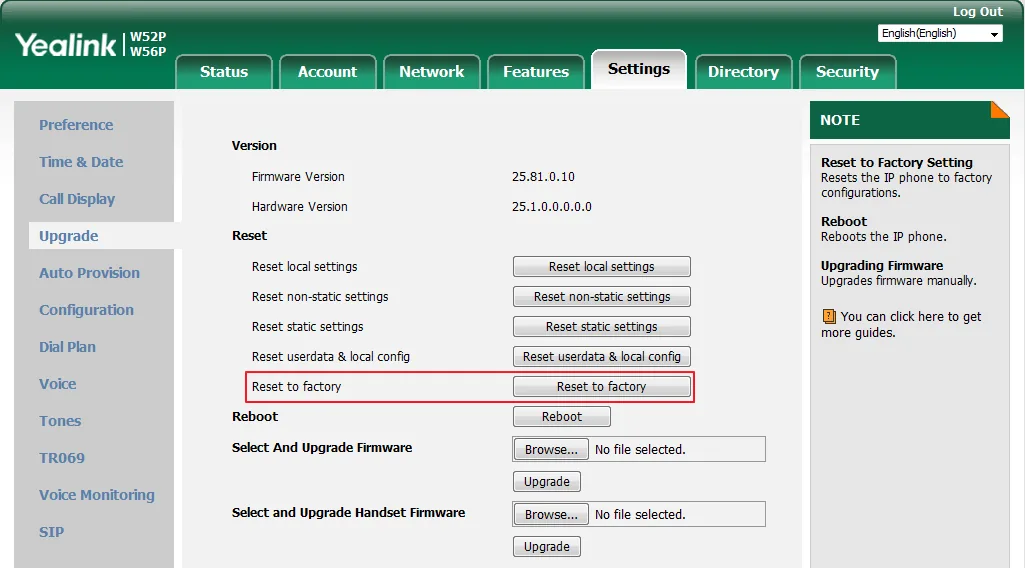 Screenshot: Yealink IP DECT Phone Administrator Guide V81.10, p. 469.
What happens: the SIP accounts, network settings, line assignment, language, directory and handset settings are erased; the handset pairing survives — you will not have to re-marry them to the base. The web interface password goes back to admin, the system PIN back to 0000. The power and network LEDs flash slowly in turn; the reset takes a few minutes — do not cut the power until the base has started up.
A handset is reset separately (OK → Settings → System Settings → Handset Reset) — that only wipes its personal settings: volume, ringtone, name.
After the reset: language → time zone → change the administrator password → the account (step 3) → line assignment (step 4).
If the handset does not register#
- The handset says “Unregistered!” — that is radio, not the PBX: the handset is not paired with the base. See “Pairing the handsets with the base”.
Register Statusis empty or notRegistered— check the username: it must be the fullsip-…-<number>from the admin panel window, not the short extension number, and it goes into both fields —Register NameandUser Name.- The password is outdated. If somebody clicked “Reset password” in the admin panel, the old password no longer works — issue a new one and enter it.
- The handset is registered but neither rings nor dials — no line is assigned to it. That is step 4, Account → Number Assignment.
- An outbound proxy or NAT/STUN is on. On the account page disable Enable Outbound Proxy Server and set NAT: Disabled.
- Wrong server address. A venue with a dedicated machine has its own address — copy it from the admin panel window instead of typing it from memory.
- Transport. Keep
UDP; the platform provides no TLS — with TLS the base will not register. - The venue network: SIP ALG on the router, the base in a guest Wi-Fi segment, UDP 5060 blocked — common network causes.
- The call breaks up when the employee walks to the far end of the room — that is DECT range, not registration: you need a repeater (OK → Settings → System Settings → Repeater Mode) or a second base.
Still stuck — or the phone is registered but there is no audio, calls drop after 30 seconds, incoming calls do not arrive? Troubleshooting by symptom — “Phone not working”; on-screen messages and error codes — “Not registering: error codes”.
Models in the family#
The web interface is the same on every base: Account → Register, Account → Number Assignment, Settings → Upgrade. Capacity and radio differ.
| Model | What it is | Handsets per base | Power | Setup differences |
|---|---|---|---|---|
| W52P | W52B base + W52H handset, the oldest kit | up to 5 | PoE 802.3af or a 5 V adapter | Set up as described; discontinued, no firmware updates |
| W56P | base + W56H handset (recent batches ship with a W60B base) | up to 5 (up to 8 with a W60B base) | PoE 802.3af or a 5 V adapter | None |
| W60B | base on its own (the kit with a handset is the W60P) | up to 8 | PoE 802.3af or a 5 V adapter | None |
| W53P | W60B base + W53H handset | up to 8 | PoE 802.3af or a 5 V adapter | None |
| W70B | the next-generation base, on its own | up to 10 | PoE 802.3af or an adapter | None |
| W73P / W76P / W78P / W79P | “W70B base + handset” kits (W73H / W56H / W78H / the rugged W59R) | up to 10 | PoE 802.3af or an adapter | None |
| W80DM / W90DM | not a base but a multi-cell manager: several W80B/W90B bases over a large area with seamless handover | dozens (depends on the number of bases) | PoE 802.3af | Not covered by this page: the manager has its own interface with base station deployment. The extension credentials are the same ⚠️ verify |
| Handsets W53H, W56H, W73H, W78H, W59R | handsets for the bases above | — | charging cradle | They have no SIP settings of their own: everything lives in the base |
The CP930W / CP935W stand apart — cordless conference phones that register to the same base as a handset (their menu paths read Menu → … / More → …).
Frequently asked questions#
Where do the username and password go — into the handset or into the base?#
Into the base, through its web interface. A handset has no SIP account of its own: it uses the lines the base handed it (Account → Number Assignment). That is also why the admin panel shows one device — the base.
How many employees fit on one base?#
As many as there are handsets: W60B up to 8, W70B up to 10, the older W52P/W56P up to 5. Keep in mind that a base holds fewer simultaneous calls than handsets (4 on the W52P/W56P, 2 per handset). If the rush hour needs more, add a second base rather than more handsets.
The handset is registered but cannot call — what is wrong?#
No outgoing line is assigned to it. Open Account → Number Assignment, tick the line for that handset in the Outgoing lines block and select it in the Default column.
Does a base reset remove the handset pairing?#
No. A factory reset of the base erases the SIP accounts, the network settings, the line assignment and the administrator password, but keeps the handset registrations — you will not have to pair them again. What you do have to re-enter are the extension credentials from the admin panel.
The web interface password of the base is lost#
It cannot be recovered. Reset the base to factory from a handset: OK → Settings → System Settings → Base Reset, PIN 0000 → Reset to factory. After the reset the password is admin again.
We bought a used base and the settings keep coming back — why?#
The provisioning server address of the previous provider is still inside: on every reboot the base downloads someone else’s configuration over yours. Only a factory reset cures it, after which the provisioning address is cleared.
The range is not enough for the whole floor — what now?#
Turn on a repeater: OK → Settings → System Settings → Repeater Mode, then register a Yealink DECT repeater (RT10/RT20/RT30) to the base. Repeater mode and the “eco mode+” power saving cannot be used at the same time. PBX settings and codecs have no effect on range.
Sources#
- Yealink IP DECT Phone Administrator Guide V81.10 (W52P/W56P; the base web interface, Account → Register, Number Assignment, Settings → Upgrade) — support.yealink.com
- Yealink W70B DECT IP Phone User Guide V85.40 (the paging key on the base, handset pairing, Base Reset, the 10-handset capacity) — support-cdn.yealink.com
- Yealink W59R (W60B) DECT IP Phone User Guide V85.20 (the W60B base: the 8-handset capacity, repeater mode) — support-cdn.yealink.com
- Yealink W70B IP DECT Phone Administrator Guide V85.30 (the same for the W60B/W70B generation: the
admin/adminlogin, the base address via Status → Base,Settings → Upgrade → Reset to Factory, the line check via Status → Line Status). Yealink does not hand out recent administrator guides by direct link — its documentation portal runs on JavaScript; a copy is at data.nag.wiki, the official portal is support.yealink.com - The source registry of the catalogue:
docs/phone-knowledge/sources/yealink.json
The web interface screenshots were taken on a W52P/W56P: on the W60B and W70B the Account → Register, Account → Number Assignment and Settings → Upgrade pages look the same and live under the same paths — the W70B V85.30 administrator guide confirms it. The single ⚠️ verify mark above is the setup order for the multi-cell W80DM/W90DM: they have their own deployment guide and are not configured from this page.