Panasonic KX-HDV / KX-TGP / KX-UT — setting up for our PBX
Panasonic is the “office” alternative to the Chinese phones: the KX-HDV130 and KX-HDV230 desk sets, the KX-HDV330/340/430 with a bigger screen, the KX-TGP600 DECT system with KX-TPA60/65 handsets, and the discontinued but still widespread KX-UT range. All of them are configured from a web interface, and all of them share one trait that regularly makes people think the phone is broken:
The second trait is the factory administrator password: admin / adminpass, not the usual admin/admin.
The credentials, the network requirements and the universal values are on the overview page “Setting up SIP phones”. This page is about Panasonic only.
What you will need#
- The extension credentials from the admin panel: SIP server, user name, password, port, transport — see “Credentials”.
- The phone on the same network as your computer. Out of the box it takes its address over DHCP (“DHCP–AUTO”).
- A computer with a browser on that same network.
- Physical access to the device — the web interface cannot be enabled any other way. For the KX-TGP600 you need a registered handset: the base menu lives in it.
Step 1. Find the phone's IP address#
On the idle phone press Menu, choose “System Settings” → “Status” → “IPV4 Settings”. The “IP Address” row is the address of the phone on your network. The same “Status” menu holds “Line Status” (REGISTERED / REGISTERING / empty) — you will need it in step 4.
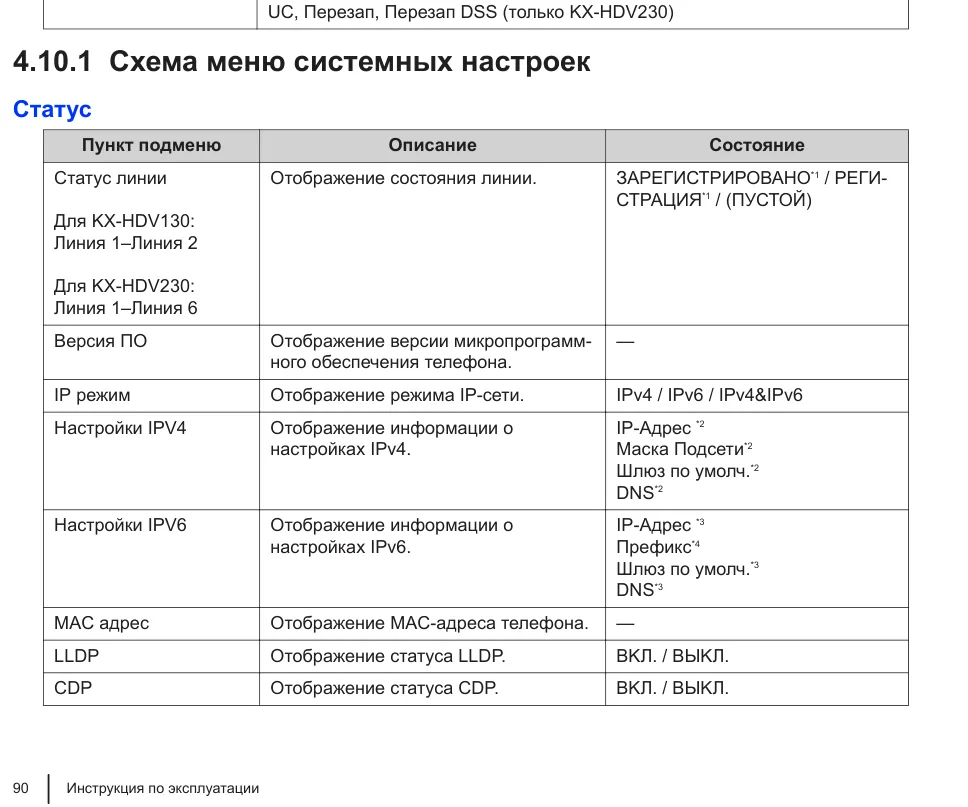 Screenshot: KX-HDV130/230 Operating Instructions (Russian edition), p. 90.
On the KX-TGP600 the same path is dialled on the handset (Menu → Status → IPV4 Settings) and shows the address of the base unit — that is the one you need for the web interface. If the value is not set yet, the screen shows 0.0.0.0: the phone has not received an address, wait or check the cable.
Step 2. Enable the web interface and log in#
First open the web port from the device itself — it is closed by default.
KX-HDV130/230/330/430: Menu → “System Settings” → “Network Settings” → “Embedded Web” → “On”. The same item is in the basic settings: “Other Option” → “Embedded Web”.
KX-TGP600 (from a KX-TPA60/65 handset): Menu → “Setting Handset” → “Other Option” → “Embedded Web” → “On”.
KX-UT113/123/133/136/248: press Setup and dial the direct command #534, then choose “Enable” for Embedded Web.
Now open http://<phone IP> and log in:
| Factory value | |
|---|---|
| Address | http://<phone IP> |
| Administrator ID | admin |
| Administrator password | adminpass |
| User account | user, empty password — it has no line settings |
Three consecutive failed logins close the web port again — then you have to enable it on the device once more. Only one account can be logged in to the web interface at a time.
When you are done, close the port again: the [Web Port Close] button in the web interface, or the same “Embedded Web” item set to “Off”. A phone on the shared network of the venue with an open web interface is one door too many.
Step 3. Enter the PBX credentials#
In the web interface open the VoIP tab → SIP Settings → Line 1 in the left menu and fill in the Basic block:
| In the admin panel (“Extension credentials”) | On the phone (VoIP → SIP Settings, Line 1) |
|---|---|
| SIP server | Registrar Server Address and Proxy Server Address — the same address in both fields |
Port 5060 |
Registrar Server Port and Proxy Server Port (factory value 5060) |
User name (sip-…-<extension>) |
Phone Number and Authentication ID — in full, in both fields |
| Password | Authentication Password |
Transport UDP |
Transport Protocol in the Advanced block further down the same page |
| Extension number | The line label is set separately, under Telephone → Line Settings |
Leave Presence Server, Outbound Proxy Server Address and Service Domain empty — our PBX does not use them.
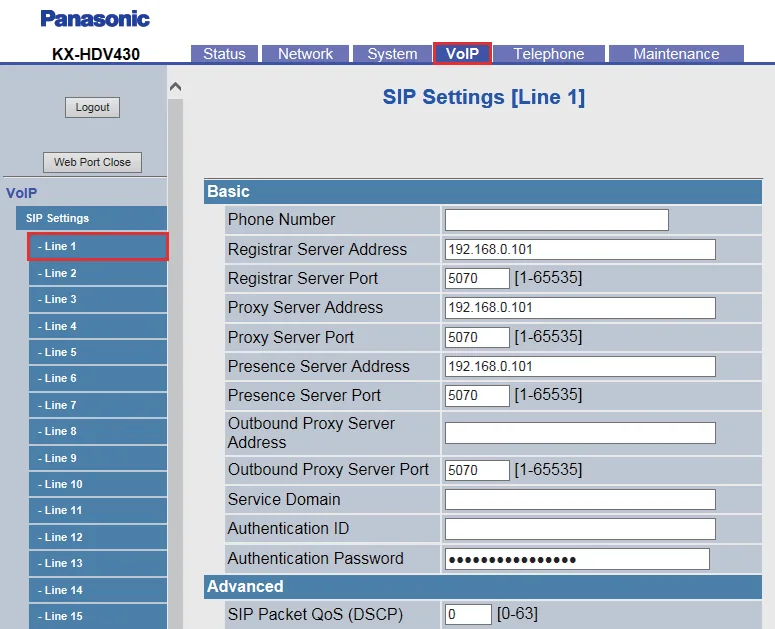 Screenshot: KX-HDV130/230/330/430 Administrator Guide (Russian edition), p. 126.
Press Save. The line restarts and goes out to register.
Optional: codecs, time, DNS, provisioning a fleet
- Codecs — VoIP → VoIP Settings [Line n], the block with G.722 and G.711. Keep G.711 A-law, G.711 µ-law and G.722; the rest can be disabled.
- Transport — VoIP → SIP Settings [Line n] → Advanced → Transport Protocol. Ours is
UDP. - Registration lifetime — the REGISTER Expires Timer in the same block. The factory value is fine.
- Enable DNS SRV lookup — leave it off: our PBX address resolves through a plain A record.
- Time — the System tab, NTP and time zone. Without correct time the call history carries wrong timestamps.
- Provisioning a fleet. The platform has no provisioning server of its own, but the phone can fetch a configuration by itself: Maintenance → Provisioning Maintenance. On a phone that came from a previous provider this section must be cleared — otherwise the phone downloads someone else's configuration over yours.
- In configuration files the same fields are
SIP_RGSTR_ADDR_n,SIP_PRXY_ADDR_n,SIP_AUTHID_n,SIP_PASS_n,PHONE_NUMBER_n— useful if the fleet is provisioned from your own server.
Step 4. Check the registration#
- On the phone: Menu → “System Settings” → “Status” → “Line Status” should read
REGISTERED.REGISTERINGmeans it is trying; empty means the line is not configured. - In the web interface: the Status → VoIP Status tab — a table of lines with the number and the state.
- In the admin panel (Telephony → Staff & groups) the operator gets a green dot and the string the phone reported about itself. The status comes from the PBX and is refreshed at most once a minute.
- A test call to a colleague's extension.
Audio quality — the *43 echo test. The green dot only speaks about registration: the voice travels as a separate stream and breaks separately. Dial *43 on the phone and press Send / OK (most devices do not start dialling on a star key by themselves). The PBX answers, plays a short beep after a second and then plays your own voice back to you — speak into the handset for about ten seconds and listen to yourself. You hear both the beep and yourself: audio flows both ways. Beep but no voice: audio does not reach the PBX from the phone (SIP ALG on the router is the usual culprit). Not even a beep: audio does not reach the phone from the PBX. All outcomes and the measured numbers (loss, jitter, latency) are covered in “Checking call quality”.
Factory reset#
The Panasonic administrator guide states it plainly: perform a reset before connecting the unit to a different phone system. A second-hand phone, or one from a previous provider, keeps those settings in a separate layer, and they survive a simple edit of the fields.
From the web interface (all models). The Maintenance → Reset to Defaults tab → the [Reset to Carrier Defaults] button → OK in the confirmation dialog. The unit reboots — even if somebody is on a call at that moment.
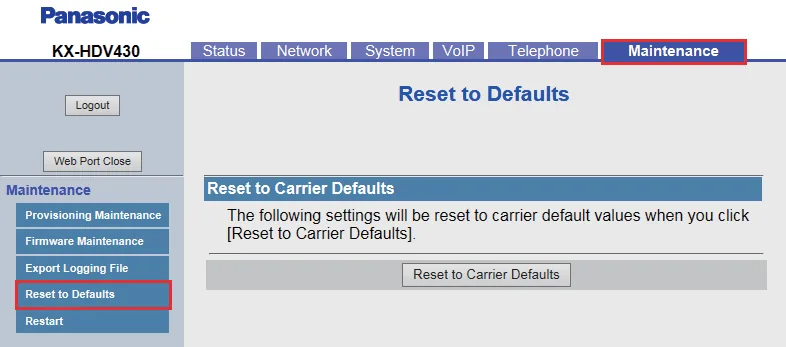 Screenshot: KX-HDV130/230/330/430 Administrator Guide (Russian edition), p. 177.
From the device, on the KX-UT113/123/133/136/248: press Setup, dial #136, choose “Factory Settings” → “Yes” → “Yes”. This is a full initialisation: settings, call logs and the phonebook are all erased, and the phone reboots by itself. A separate command, #739, resets only the web interface ID and password — that is what to use when the administrator password is lost but the settings should stay.
KX-TGP600 (DECT). The base unit is reset with the same [Reset to Carrier Defaults] from the web interface; while it resets, the STATUS indicator flashes quickly — wait for it to stop. A handset is de-registered separately: Menu → “System Settings” → “Cancel Handset”. The factory base PIN is 1234 (the “Change Base PIN” item).
What is erased: line accounts, network settings, language, the phonebook and the logs. The firmware stays. After a reset the web interface is off again — start from step 2.
If the phone does not register#
- The server address is filled in only one field. Panasonic has two: Registrar Server Address and Proxy Server Address. Put our address in both.
- The user name is not entered in full. Authentication ID and Phone Number need the whole
sip-…-<extension>, not the short extension number. - The password is stale — somebody pressed “Reset password” in the admin panel. Issue a new one.
- Transport Protocol is not UDP (VoIP → SIP Settings → Advanced). A second-hand phone often keeps TCP or TLS there.
- The port is not 5060. The Panasonic factory value is
5060, but5070shows up in vendor examples and at some providers; check both port fields. - The settings “come back on their own” — the previous provider's provisioning is running: Maintenance → Provisioning Maintenance, and it is best to do a full reset straight away.
- The web interface stopped opening halfway through setup — three failed logins close the web port. Enable “Embedded Web” on the device again.
The generic network causes (ports, SIP ALG, guest Wi-Fi) are listed in “If it does not register” on the overview page.
Still stuck — or the phone is registered but there is no audio, calls drop after 30 seconds, incoming calls do not arrive? Troubleshooting by symptom — “Phone not working”; on-screen messages and error codes — “Not registering: error codes”.
Models in the family#
| Model | Screen / lines | PoE | Setup specifics |
|---|---|---|---|
| KX-HDV100 ⚠️ verify | Entry-level, no colour screen | No | The entry model of the range; the vendor publishes its documents separately from the KX-HDV130/230 — check the manual for this exact model |
| KX-HDV130 | Monochrome, 2 lines | Yes | The base model; everything above applies to it first of all |
| KX-HDV230 | Monochrome + 12 DSS keys, 6 lines | Yes | Has an extra “DSS Restart” item in the system settings |
| KX-HDV330 / KX-HDV340 | Colour, up to 16 lines | Yes | Same menu, more key pages |
| KX-HDV430 | Colour, up to 16 lines, network camera support | Yes | The screenshots on this page were taken from it |
| KX-TGP600 + KX-TPA60/65/68 | DECT system: base and handsets, up to 8 lines | Yes (base) | You configure the web interface of the base; the base menu is opened from a handset. Handsets register to the base separately |
| KX-UT113 / KX-UT123 | Monochrome, 2 lines | KX-UT123 — yes | Discontinued. The web interface is enabled with #534, the reset is #136 |
| KX-UT133 / KX-UT136 | Monochrome, 4 lines | Yes | Same |
| KX-UT248 | Colour, 6 lines | Yes | Same; the top model of the KX-UT range |
The KX-TGP500/550 range (Panasonic's earlier DECT system) is not covered here: its web interface differs and the vendor publishes a separate guide for it. ⚠️ verify
FAQ#
The web interface of a Panasonic phone does not open#
That is by design: the web port is closed from the factory. Enable it on the device — Menu → System Settings → Network Settings → Embedded Web → On (on the KX-UT, press Setup and dial #534), then open http://<phone IP> and log in as admin / adminpass.
The web administrator password is lost#
The KX-UT has the #739 command, which resets only the web interface ID and password and leaves the line settings alone. The KX-HDV and the KX-TGP600 have no such command: only a full reset (Maintenance → Reset to Defaults) is left, after which the account has to be entered again.
The phone came from a previous telephony provider — what now?#
Reset it first (Maintenance → Reset to Defaults → [Reset to Carrier Defaults]) and only then enter our credentials: the Panasonic administrator guide explicitly requires this before connecting the unit to a different phone system. The “carrier” settings live in a separate layer and survive a plain edit of the fields — the phone will stubbornly keep talking to the old server.
Panasonic registers, but the call drops after half a minute#
That is not registration but the media stream: almost always SIP ALG on the venue router. Turn it off — see “The venue network”.
How do I set up KX-TPA60 handsets on a KX-TGP600 base?#
The line accounts are created in the web interface of the base (VoIP → SIP Settings), and a handset is bound to the base through Menu → System Settings → Handset Registration on the handset itself; the factory base PIN is 1234. One line can be assigned to several handsets, in which case the call rings on all of them.
Sources#
- KX-HDV130/230/330/430 Administrator Guide (Russian edition) — https://www.psn-web.net/cs-im/Global/SIPPHONE/sipphone_net/download/HDV430/manual/ag/HDV130_230_330_430_AG(ru)_XA.pdf
- KX-HDV130/230 Operating Instructions (Russian edition) — https://www.psn-web.net/cs-im/Global/SIPPHONE/sipphone_net/download/HDV230/manual/hdv230/oi/HDV130_230_OI(ru)_YA.pdf
- KX-TGP600 Administrator Guide (English, rev. 2019-03) — https://www.psn-web.net/cs-im/Global/SIPPHONE/sipphone_net/download/TGP6/manual/CE/TGP600_AG(en)_QA.pdf
- KX-TGP600/TPA60/TPA65 Operating Instructions (Russian edition) — https://www.psn-web.net/cs-im/Global/SIPPHONE/sipphone_net/download/TGP6/manual/CE/TGP600_TPA60_TPA65_OI(ru)_TA.pdf
- KX-UT113/123/133/136/248 Administrator Guide (Russian edition) — https://www.psn-web.net/cs-im/Global/SIPPHONE/sipphone_net/download/UT1/manual/RU/UTxx_248_RU_AG_Russian_UA.pdf
- Panasonic SIP Phone support — manuals and firmware for the whole range: https://panasonic.net/cns/pcc/support/sipphone/