Grandstream HT80x/HT81x (ATA) — setting up for our PBX
The HT8xx (HandyTone in the catalogues) is a small box that turns an ordinary analog phone into an extension of our PBX. Twisted pair from the venue network goes in, an RJ-11 phone cord goes out to the familiar handset: the push-button phone on the front desk, the cordless phone in the office, or a fax machine. You do not replace the phone — you change where it calls.
The models differ only in the number of phone ports: HT801 has one, the HT802 and HT812 two, the HT814 four, the HT818 eight, and the HT813 one phone port plus one port for an analog landline. Every port is a separate extension with its own username and password from the admin panel.
The adapter has no screen, so everything you would normally read off a phone it says out loud: pick up the handset of the connected phone and dial ***. Common credentials and network requirements are on the overview page “Setting up SIP phones”.
What you will need#
- The extension credentials from the admin panel: Admin panel → Telephony → Staff & groups tab → “Reset password” next to the operator. The “Extension credentials” window shows the SIP server, extension number, username, password, port and transport (details).
- An analog phone plugged with an RJ-11 cord into the green Phone / FXS 1 port of the adapter. Without it the voice menu will not work.
- Network: the blue Internet port of the adapter into the venue switch or router. The HT8xx specifications list no PoE: the supplied power adapter is required (5 V over micro-USB on the HT801/HT802, 12 V on the HT818).
- A computer on the same network, with a browser.
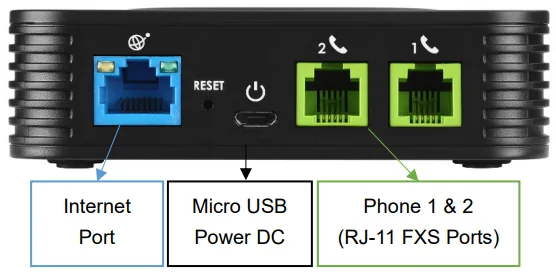 Screenshot: Grandstream HT801/HT802 Administration Guide, “HT802 Back Panel”, documentation.grandstream.com.
Step 1. Find the IP address of the adapter#
- Pick up the handset of the phone plugged into Phone 1 (FXS 1).
- Dial
***— a voice says “Enter a menu option”. - Dial
02— the adapter reads out its current IP address.
Write the address down and hang up. If you hear a dial tone but no voice, the phone is in the wrong socket (on the HT813 the voice menu works on the FXS port only, not on the FXO one).
Other useful options in the same menu: 01 — how the address is obtained (DHCP or static, “9” toggles), 10 — the MAC address of the unit, 16 — the firmware version, 99 — reboot and reset.
If you cannot get the IP: DHCP, the LAN port, web access
- The adapter got no address. Dial
***, then01— the voice tells you the current mode. If it says “Static IP Mode”, switch to DHCP with9and reboot the adapter (***,99,9). - The HT812/HT814/HT818/HT813 have two network ports — Internet (WAN) and LAN: inside there is also a small router. The cable from the venue network always goes into Internet. If you cannot reach the web interface from the network side, plug a laptop straight into the LAN port of the adapter and open
http://192.168.2.1— the computer gets a192.168.2.xaddress from the adapter itself. - Web access from the Internet port on the multi-port models is enabled while the address is private (
192.168.x.xand the like) and disabled when the adapter holds a public address. Turn it on from the voice menu:***→12→9, then reboot.
Step 2. Log in to the web interface#
Open http://<adapter IP> in a browser.
| Factory value | |
|---|---|
| Address | http://<adapter IP> |
| Username | admin |
| Password (HT801/HT802/HT812/HT814/HT818/HT813, early revisions) | admin |
| Password (V2 revisions — HT80x V2, HT81x V2) | random, printed on the label on the bottom of the unit |
The password is case-sensitive. V2 revisions have no shared factory password at all: turn the adapter over and type the string from the label. After the first login the device asks you to change the password — the new one must be 8–20 characters long and contain a digit, an uppercase and a lowercase letter.
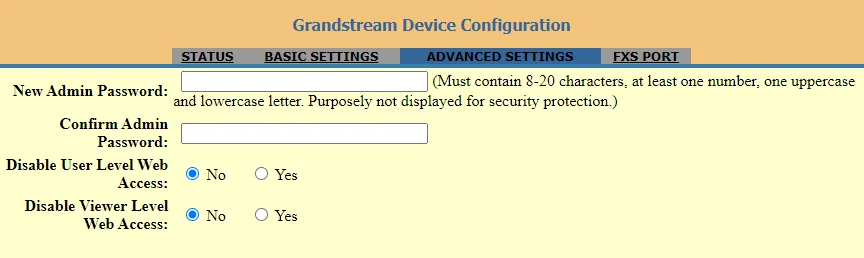 Screenshot: Grandstream HT801/HT802 Administration Guide, “Changing Admin Level Password”, documentation.grandstream.com.
If the password was changed and forgotten, it cannot be recovered — only a factory reset helps.
Step 3. Enter the PBX credentials#
Open the FXS PORT tab (on multi-port models — FXS PORT1, FXS PORT2 and so on: one tab per phone socket). Fill it in like this:
| In the admin panel (“Extension credentials”) | In the adapter (the FXS PORT tab) |
|---|---|
| — | Account Active → Yes (the factory value is No, and without it the port does not register) |
| SIP server | Primary SIP Server |
Port 5060 |
there is no separate field — 5060 is used by default; leave Local SIP Port (the port the adapter sends from: 5060 on the first port, 5062 on the second) alone |
Transport UDP |
SIP Transport → UDP |
Username (sip-…-<number>) |
SIP User ID and Authenticate ID — the same long string in both fields |
| Password | Authenticate Password |
| Extension number | Name — the account caption, visible in the interface only |
Leave Failover SIP Server, Outbound Proxy and Backup Outbound Proxy empty, set Prefer Primary SIP Server → No and NAT Traversal → No: we run no backup server, and a stray proxy or STUN breaks registration.
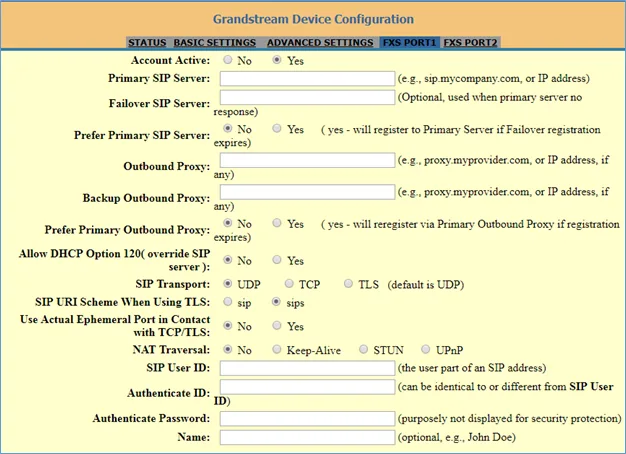 Screenshot: Grandstream HT801/HT802 Administration Guide, “Configuring HT801/HT802 through Web Browser”, documentation.grandstream.com.
At the bottom of the page press Update, then Apply. FXS Port settings take effect after a reboot — press Reboot on the BASIC SETTINGS tab or simply power-cycle the adapter.
Optional: codecs, fax, gain, the second port
- Codecs — on the same FXS Port tab, the Preferred Vocoder fields: put
PCMUandPCMA(that is G.711) first andG722third;G723,G726,iLBCandOPUSare not needed. - Fax. For a fax machine enable T.38 on the port: a plain voice codec breaks fax almost every time.
- Gain and sensitivity of an old handset are tuned on the port (Gain), not on the phone itself.
- Pulse dialling (old rotary phones) is not understood — the adapter expects tone dialling (DTMF). Push-button phones and cordless handsets work as they are.
- Several extensions. The HT802 and HT812 have two ports, the HT814 four, the HT818 eight; each FXS PORT tab takes its own credentials from the admin panel. There is no need to put one extension on two ports.
- The HT812/HT814/HT818/HT813 also have a PROFILES tab: the SIP server address can be set once in a profile, leaving only the usernames and passwords on the port tabs, with the Profile ID field choosing the profile.
Fleet provisioning
The platform runs no provisioning server of its own — the adapter is configured with the fields above. If you run your own server, Grandstream devices fetch cfg<MAC>.xml (and cfg<MAC> in the old format) from the address in ADVANCED SETTINGS → Config Server Path; the same address arrives over DHCP option 66 and is set from the voice menu with *** → 14. The upgrade protocol is option 15 in the same menu.
Step 4. Check the registration#
- Pick up the handset of the analog phone: you should hear a steady continuous dial tone. A busy tone or silence means the port is not registered.
- Web interface, the STATUS tab — the Port Status table: the Registration column of your port must read Registered and User ID must show your username. The same page shows the IPv4 address of the adapter and the model.
- In the admin panel (Telephony → Staff & groups) the operator gets a green dot and the string the adapter identified itself with (for example
Grandstream HT802). The status refreshes no more than once a minute. - A test call: dial a colleague’s extension on the analog phone.
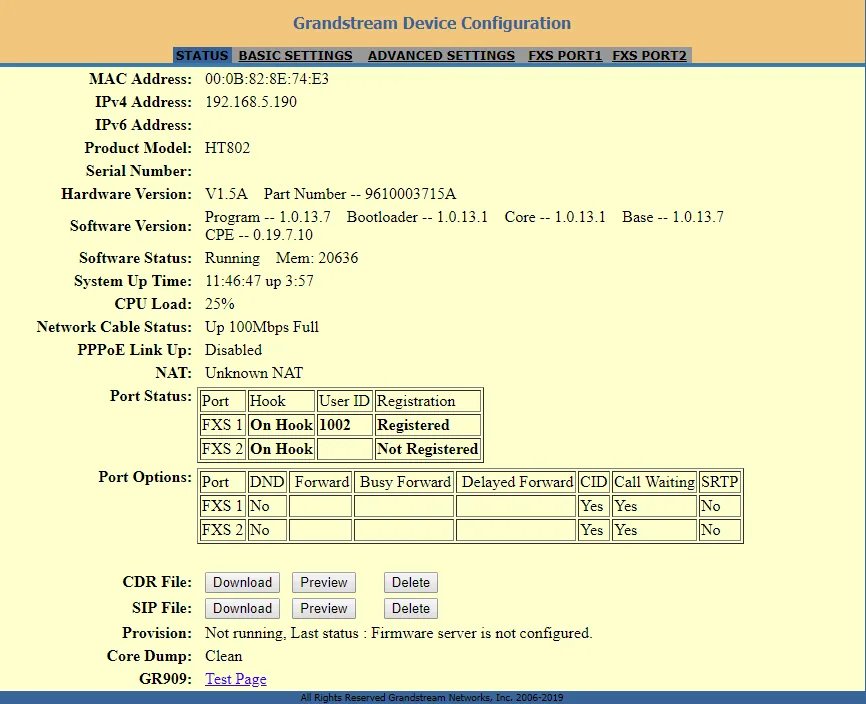 Screenshot: Grandstream HT801/HT802 Administration Guide, “Status Page Definitions”, documentation.grandstream.com.
Audio quality — the *43 echo test. Pick up the analog handset and dial *43: the PBX answers, plays a short beep and then plays your own voice back to you — speak into the handset for about ten seconds. This is the only way to test the audio of an adapter without dragging a real person into it: beep and voice — both directions are fine; beep but no voice — audio does not reach the PBX from the gateway; not even a beep — it does not reach the gateway from the PBX (and if the handset also hisses or hums, the analog phone or its wiring is to blame, not the network). ⚠️ A phone with old pulse (rotary) dialling cannot send a star key: switch it to tone mode with the Pulse/Tone switch, and if there is no such switch, test the audio with an ordinary call to a colleague. Outcomes and numbers are covered in “Checking call quality”.
Factory reset#
A reset is needed if the adapter came from a previous operator (someone else’s account inside, and someone else’s provisioning address — it will restore its own configuration on every reboot), if the administrator password is forgotten, or if the device behaves inexplicably. Everything is wiped: the port accounts, the network settings, the passwords, the voice menu language; the firmware stays.
With the button on the case (the simplest way):
- Unplug the network cable.
- Find the small RESET hole on the back panel (see the photo above).
- Insert a pin and hold it for about 7 seconds, then release. The adapter reboots clean.
Through the voice menu (when you cannot reach the button):
- Pick up the handset, dial
***, then99— the voice says “reset”. - Dial the MAC address of the unit (the 12 characters from the label on the bottom), encoding letters as repeated digits:
A=22,B=222,C=2222,D=33,E=333,F=3333. For example, MAC000b8200e395is keyed in as0002228200333395. - Wait about 15 seconds — the adapter reboots and comes back at factory settings.
From the web interface, if you still know the password: the BASIC SETTINGS tab → Reset Type. Here the reset can be partial: Full Reset wipes everything, ISP Data Reset only the network settings, VoIP Data Reset only the port accounts (handy when the network is right but the account is someone else’s). Choose the type and press the reset button next to it.
After the reset the administrator password is admin again (on V2 revisions — the string on the label again), the adapter takes its address over DHCP, and the extension credentials are entered again as in step 3.
Two situations where a reset will not work: the Lock keypad update setting is on (resets from the handset are forbidden), and the adapter was locked by a previous service provider — then the RESET button only restarts the unit.
If the adapter does not register#
Account ActiveisNo. The port ships disabled — set it toYeson the FXS PORT tab and reboot the adapter.- No dial tone in the handset. The dial tone appears only on a registered port — look at STATUS → Port Status, not at the phone.
- The username is not complete. It must be the whole
sip-…-<number>string from the admin panel window, not the short extension number, and it goes into both fields —SIP User IDandAuthenticate ID. - The password is outdated. If somebody clicked “Reset password” in the admin panel, the old one no longer works — issue a new one.
- You pressed Update but not Apply (or did not reboot). FXS port settings take effect after a reboot of the adapter.
- An Outbound Proxy is filled in or NAT Traversal is on. Clear the proxy fields and set
NAT Traversal: No. - Transport is TLS. Keep
UDP— the platform provides no TLS. - Wrong server address. A venue with a dedicated machine has its own; copy it from the admin panel window.
- The settings “come back” after a reboot — a foreign provisioning server address is stored in the adapter. Only a factory reset cures it.
- The venue network: SIP ALG on the router, the adapter in a guest segment, UDP 5060 blocked — common network causes.
Still stuck — or the phone is registered but there is no audio, calls drop after 30 seconds, incoming calls do not arrive? Troubleshooting by symptom — “Phone not working”; on-screen messages and error codes — “Not registering: error codes”.
Models in the family#
The web interface is the same everywhere: the STATUS, BASIC SETTINGS, ADVANCED SETTINGS tabs and one FXS PORT tab per phone socket.
| Model | Phone ports (FXS) | Network ports | Factory admin password | Setup differences |
|---|---|---|---|---|
| HT801 | 1 | one (Internet) | admin; on the V2 revision — from the label |
One FXS PORT tab, one extension |
| HT802 | 2 | one (Internet) | admin; on the V2 revision — from the label |
Two tabs, two different extensions |
| HT812 | 2 | two (Internet + LAN, a router inside) | admin; on the V2 revision — from the label |
Has a PROFILES tab: the server address can be set once for both ports |
| HT814 | 4 | two (Internet + LAN) | admin; on the V2 revision — from the label |
The same, four port tabs |
| HT818 | 8 | two (Internet + LAN) | admin; on the V2 revision — from the label |
The same, eight port tabs |
| HT813 | 1 FXS + 1 FXO | two (Internet + LAN) | admin |
The FXO port is for an analog landline, not for a phone. On power loss the phone is connected straight through to the landline (lifeline). The extension is set up on the same FXS PORT tab |
The revision (“V2”) is printed on the label next to the MAC address; the cases look identical from the outside. The only practical difference for setup is the factory administrator password.
Frequently asked questions#
There is no dial tone after the setup — what is wrong?#
The dial tone appears only once the port is registered with the PBX. Open the STATUS tab and look at the Port Status table: if the Registration column is empty or reads “Not Registered”, check Account Active: Yes, the full sip-…-<number> username in both fields, and that the adapter was rebooted after saving.
How do I find the adapter IP address with no computer nearby?#
Pick up the handset of the connected phone, dial ***, then 02 — the adapter reads the address out loud. The same menu toggles DHCP/static addressing (01) and announces the MAC (10).
The web interface password is lost — what now?#
It cannot be recovered, only reset: a pin in the RESET hole for 7 seconds, or the voice menu *** → 99 → the encoded MAC address. After the reset the password is admin again (on V2 revisions — the one on the label again), and the extension credentials have to be entered anew.
Can I connect two different extensions to one HT802?#
Yes, and that is how it is meant to be used: the HT802 has two phone ports, each configured on its own tab (FXS PORT1 and FXS PORT2) with its own username and password from the admin panel. The same goes for the HT812 (2), HT814 (4) and HT818 (8).
Will a fax machine work?#
Yes, but enable T.38 on the port tab: an analog fax over a plain voice codec breaks almost every time. Keep in mind that fax quality also depends on the channel up to the PBX.
Will an old rotary phone work?#
No. The adapter expects tone dialling (DTMF) and does not recognise the pulse dialling of rotary phones. Push-button phones and cordless handsets work fine.
What is the second network port on the HT812/HT814 for?#
There is a small router inside the adapter: the Internet port faces the venue network, the LAN port hands out 192.168.2.x addresses to whatever is plugged into it. You do not have to use it — but it saves you when the web interface is unreachable from the network: plug a laptop into LAN and open http://192.168.2.1.
Sources#
- HT801/HT802 — Administration Guide (the web interface, the FXS Port tab, the voice menu, resets) — documentation.grandstream.com
- HT80x V2 — Administration Guide (the administrator password on the label on the bottom of the unit) — documentation.grandstream.com
- HT812/HT814 — Administration Guide (the two-port models with a router, LAN access at 192.168.2.1, IVR option 12, reset types) — documentation.grandstream.com
- HT818 — Administration Guide (the eight-port model) — documentation.grandstream.com
- HT813 — Administration Guide (FXS + FXO, lifeline on power loss) — documentation.grandstream.com
- The source registry of the catalogue:
docs/phone-knowledge/sources/grandstream.json
The web interface screenshots were taken on an HT802: the HT812/HT814/HT818/HT813 have the same tabs, differing in how many there are (one per port) and in the added PROFILES tab.