Yealink T1x–T5x and CP9xx — setup for our PBX
Yealink is the most widespread brand of desk SIP phones: venues usually have the simple T30/T31/T33 at the front desk, a T4x with speed-dial keys for the manager and the touch-screen T5x in the office; for a meeting room — the CP9xx conference phone. All of these models share the same web UI and the same field names, so there is one guide: only the menu items on the device itself differ (black-and-white and colour screens name them differently — this is noted in the text).
What is the same for every brand — credentials, ports, network and when a reset is needed — is covered in the overview SIP Phone Setup. Here — only what you need to press on a Yealink.
What you need#
- Extension credentials from the admin panel: the “Extension credentials” window (Telephony → Staff & groups → “Reset password” next to the operator, or right after creating one) — SIP server, Extension number, Username, Password, Port, Transport. Details — in the overview.
- The phone connected by cable to the venue's staff network (not the guest Wi-Fi) and powered on: PoE from the switch or the Yealink 5 V power adapter (models without the letter P in the name — adapter only).
- A computer or laptop on the same network with any browser.
You can also configure the phone from the device itself (Menu → Advanced → Accounts), but typing a long login and password with the keypad is inconvenient — below is the browser path, and the keypad path is in a collapsed block.
Step 1. Find the phone's IP address#
Wait for the phone to boot (“Welcome / Initializing… please wait” on the screen, then the clock) and, while it is idle, press the OK key — the round button in the centre of the navigation cluster. The screen shows the phone's IP address (the IPv4 line) as well as the MAC address and firmware version. The same screen opens via Menu → Status.
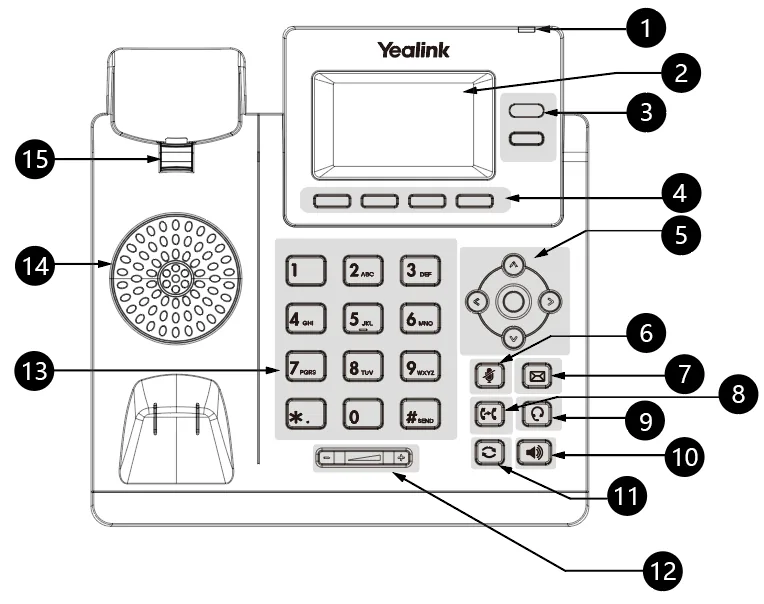 Illustration: Yealink T3 Series IP Phones User Guide V86.5, p. 12 (“Hardware”).
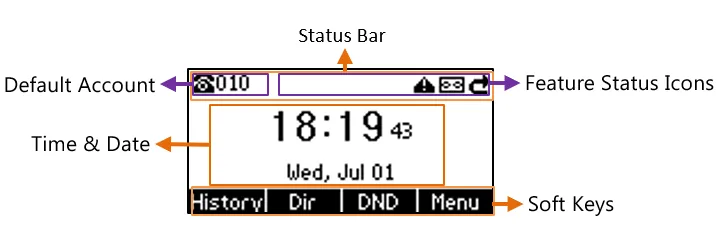 Screenshot: Yealink T3 Series IP Phones User Guide V86.5, p. 15 (“Idle Screen”).
If the screen shows 0.0.0.0 or “Network unavailable” instead of an address — the phone did not get an address from the router: check the cable (the Internet port on the phone, not PC) and that DHCP is running on the network.
Step 2. Log in to the web UI#
Open a browser on the computer and type the phone's IP into the address bar — for example http://192.168.0.10. If the browser warns about the certificate (the phone opened over https), click “Proceed” — it is the device's own self-signed certificate.
| Factory value | |
|---|---|
| Address | http://<phone IP> |
| Login | admin |
| Password | admin |
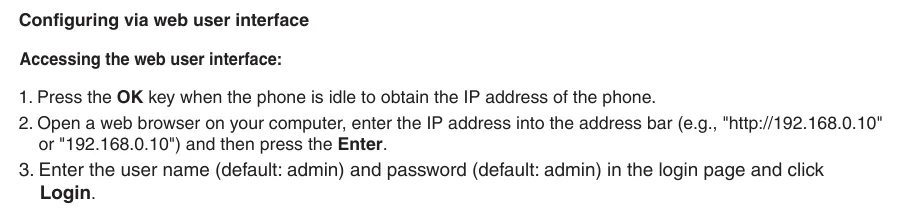 Screenshot: Yealink SIP-T46U Quick Start Guide V86.36, p. 3 (“Configuring via web user interface”).
There is a second, limited user user/user — you cannot configure an account with it; log in as admin.
While the factory password is unchanged, the phone shows a warning icon in the status bar and the web UI shows a “Default password is in use” banner. Change the password right after setup: Security → Password in the browser or Menu → Settings → Advanced Settings → Set Password on the device. If the password was changed at some point and is lost — it cannot be recovered, only a factory reset helps.
Step 3. Enter the PBX account credentials#
In the web UI open the Account tab, select Register on the left, keep Account 1 in the Account list at the top (T30/T31 have one line, the others have several; take the first one). Switch Line Active to Enabled and fill in the fields from the “Extension credentials” window:
| In the admin panel (“Extension credentials”) | In the phone (Account → Register) |
|---|---|
| SIP server | SIP Server 1 → Server Host |
Port 5060 |
SIP Server 1 → Port (the factory value is already 5060) |
Transport UDP |
SIP Server 1 → Transport → UDP (factory value) |
| Username | Register Name and User Name — the same long string sip-…-<number> in both fields |
| Password | Password |
| Extension number | Label — the line caption on the screen (the number or “Bar”) |
| — | Display Name — the name colleagues see when you call |
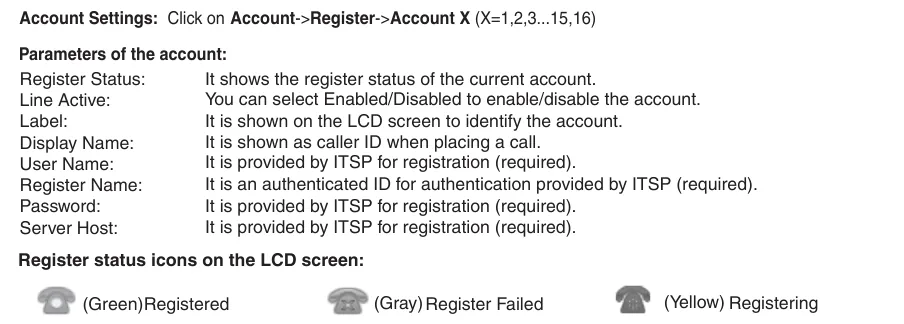 Screenshot: Yealink SIP-T46U Quick Start Guide V86.36, p. 3 (“Account Settings”).
Click Confirm at the bottom of the page. No reboot is needed — the phone registers within a few seconds.
Additionally: codecs, DTMF, NAT, time and language
None of this is required for registration — the factory values are fine. Worth checking if the phone came with someone else's settings:
- Codecs — Account → Codec → Audio Codec: the enabled list must contain PCMA (G.711 A-law), PCMU (G.711 µ-law) and G722; the rest (G729, iLBC, Opus) can stay or be disabled — the PBX does not use them.
- DTMF — Account → Advanced → DTMF Type: RFC2833 (factory value). Needed so that tone commands in the voice menu and during a call reach the PBX.
- NAT / keep-alive — Account → Advanced → Keep Alive Type: Default. STUN (Network → NAT) does not need to be enabled.
- Time — Settings → Time & Date: the venue's time zone; NTP is taken from DHCP or Yealink's server by default. Without the correct time the call history on the device will be “from the past”.
- UI language — Settings → Preference → Language (web) and Menu → Settings → Basic Settings → Language (device).
Setup from the device itself, without a browser
- Black-and-white screen (T19, T21, T23, T27, T30, T31, T40, T41, T42): Menu → Settings → Advanced Settings (password
admin) → Accounts → Account 1 → Active Line: Enabled, then Label, Display Name, Register Name, User Name, Password, SIP Server 1 and Port. - Colour screen (T33, T34W, T43U, T46, T48, T53, T54W, T57W, T58W): Menu → Advanced (password
admin) → Accounts → Account 1 → Activation: Enabled and the same fields. - CP925/CP965 conference phones: More → Advanced (password
admin) → Accounts.
Letters are typed with the numeric keypad as on old mobile phones; the case switch is the abc/ABC/2aB soft key. The hyphen in the login is on the * key or via the symbols soft key.
Step 4. Check the registration#
- On the phone. On black-and-white T3x a handset icon appears next to the line label at the top left: green — Registered (all good), grey — Register Failed (the server refused: check the login and password), yellow — Registering (waiting for the server: network, address, port). On colour models the line key to the left of the screen shows the same. A “!” icon in the status bar — open Menu → Status → Warnings: it lists the problem (including “Default password is in use”, which is not a registration error).
- In the admin panel. Telephony → Staff & groups: the operator gets a green dot, next to it — the time of the last activity and the model string the phone identified itself with (for example
Yealink SIP-T31G 124.86.0.130). The status refreshes no more than once a minute. - Call. Dial a colleague's extension. If the call goes through but one side cannot be heard — that is not registration but the voice stream: disable SIP ALG on the router (see the overview).
Audio quality — the *43 echo test. The green dot only speaks about registration: the voice travels as a separate stream and breaks separately. Dial *43 on the phone and press Send / OK (most devices do not start dialling on a star key by themselves). The PBX answers, plays a short beep after a second and then plays your own voice back to you — speak into the handset for about ten seconds and listen to yourself. You hear both the beep and yourself: audio flows both ways. Beep but no voice: audio does not reach the PBX from the phone (SIP ALG on the router is the usual culprit). Not even a beep: audio does not reach the phone from the PBX. All outcomes and the measured numbers (loss, jitter, latency) are covered in “Checking call quality”.
Factory reset#
A reset erases accounts, network settings (static IP, VLAN), language, the directory and the call history; the firmware stays. It is needed if the phone came with someone else's settings (especially with the address of a foreign auto-provisioning server — such a device will overwrite your account after every reboot), if the administrator password is lost, or if the phone behaves strangely after experiments.
From the device, if the administrator password is known:
- Menu → Settings → Advanced Settings (password
admin) → Reset Config. On T33P/T33G and other colour models: Menu → Advanced (passwordadmin) → Reset Config. - Select Reset to Factory Settings → Reset, confirm with OK.
- The phone reboots; the reset takes a few minutes — do not disconnect the power until the idle screen appears.
From the device, if the password is unknown: while idle, press and hold the OK key for about 10 seconds until the phone asks “Reset to factory setting?”, and confirm with OK. This option is enabled at the factory; if the administrator disabled it (parameter features.reset_by_long_press_enable = 0), the phone will not react or will ask for the password — then only the password path remains.
From the browser: Settings → Upgrade → Reset to Factory → answer “Do you want to reset to factory?” with OK. Next to it is Reset Local Settings — that is NOT a full reset, only clearing manual changes.
After the reset: language (Menu → Settings → Basic Settings → Language), time zone, network if needed — and step 3 again with the credentials from the admin panel. The web UI password becomes admin again.
To simply reboot the phone without a reset: Menu → Settings → Basic Settings → Reboot (on colour models — Menu → Basic → Reboot) or a long press of the ✕ (Cancel) key while idle.
If the phone does not register#
In order, from the most common to the rarest:
- Grey icon / Register Failed — the server refused. Nine times out of ten the login is not entered in full: Register Name and User Name must contain the string
sip-…-<number>, not “101”. The second candidate is the password: if someone clicked “Reset password” in the admin panel, the old one no longer works; do not guess, issue a new one and enter it again. - Yellow icon / Registering never completes — the request does not reach the server. Check Server Host (the address from the window, without
http://and without spaces), Port 5060, Transport UDP. A venue with a dedicated PBX machine has its own address, not the sharedsip.<domain>. - Line Active: Disabled — the line is simply off. Enable it and click Confirm.
- The phone got an IP but has no internet access — the router blocks outgoing UDP 5060 or SIP ALG is on; the phone is on the guest Wi-Fi/VLAN. Connect it by cable to the staff network.
- Settings “change by themselves” after a reboot — the phone pulls a foreign configuration from the previous owner's provisioning server: Settings → Auto Provision → clear Server URL, disable PNP Active and DHCP Active — or do a reset.
- Non-SIP firmware. Yealink ships the same models with Microsoft Teams / Skype for Business / Zoom firmware (for example T55A, T56A, T58A, the MP series): the boot screen shows the Teams/Zoom logo and the web UI has no Account tab at all. Such a device cannot be connected to a regular PBX until SIP firmware from the Yealink site is loaded (it does not exist for every model).
Still stuck — or the phone is registered but there is no audio, calls drop after 30 seconds, incoming calls do not arrive? Troubleshooting by symptom — “Phone not working”; on-screen messages and error codes — “Not registering: error codes”.
Models in the family#
The web UI and account fields are the same on all of them; the differences are the screen, the number of lines and power. The letter P in the name = PoE support, G = gigabit ports (and PoE), U/W = newer generations (all have PoE).
Model table
| Model | Screen / lines | PoE | Setup notes |
|---|---|---|---|
| SIP-T19 E2 / T19P E2 | mono, 1 line | P only | “black-and-white” menu type |
| SIP-T21 E2 / T21P E2 | mono, 2 lines | P only | — |
| SIP-T23G | mono, 3 lines | yes | — |
| SIP-T27G | mono, 6 lines | yes | — |
| SIP-T30 / T30P | mono, 1 line | P only | Menu → Settings → Advanced Settings |
| SIP-T31 / T31P / T31G | mono, 2 lines | P and G only | — |
| SIP-T33P / T33G | colour, 4 lines | yes | shorter menu items: Menu → Advanced, Menu → Basic |
| SIP-T34W | colour, 4 lines, Wi-Fi | yes | network can be set up over Wi-Fi (Menu → Advanced → Network → Wi-Fi) |
| SIP-T40G / T41S / T42S | mono, 3–12 lines | yes | discontinued, firmware V84–V85 — same fields |
| SIP-T43U / T46U / T48U | mono 3.7" / colour 4.3" / touch 7"; 12–16 lines | yes | lines — keys on the left or on the screen |
| SIP-T46S / T48S | colour / touch, 16 lines | yes | previous generation of T4U |
| SIP-T53 / T53W / T54W | mono / colour, 12–16 lines; W — Wi-Fi and Bluetooth | yes | — |
| SIP-T57W / T58W | touch 7", 16 lines; T58W — with a camera | yes | — |
| CP920 / CP925 / CP965 | conference phone, touch | yes (CP965 — PoE+) | on the device: More → Advanced → Accounts |
Not usable without reflashing: models with the A index and the MP line (T55A, T56A, T58A, MP52/MP54/MP56) — these are Android-based Teams/Zoom phones.
Fleet provisioning
Yealink can pull its configuration from a TFTP/HTTP/HTTPS server: first the common file y000000000000.cfg (per model, for example y000000000123.cfg), then the personal <MAC>.cfg. The phone gets the server address via DHCP option 66 (or 43) or from Settings → Auto Provision → Server URL. Manual changes in the web UI end up in the <MAC>-local.cfg file on the phone itself.
Account parameters in the file:
account.1.enable = 1
account.1.label = Bar
account.1.display_name = Bar
account.1.user_name = sip-xxxxxxxx-101
account.1.auth_name = sip-xxxxxxxx-101
account.1.password = <password from the admin panel>
account.1.sip_server.1.address = <SIP server from the admin panel>
account.1.sip_server.1.port = 5060
account.1.sip_server.1.transport_type = 0
Our platform does not run a provisioning server — this is the path for a venue with its own provisioning server (described in the Yealink Auto Provisioning Guide, see “Sources”).
FAQ#
The phone shows a grey handset icon and “Register Failed” — what should I do?#
The server refused the registration: wrong login or password. Open Account → Register and check that Register Name and User Name contain the full login (sip-…-<number>) and the password is the last one issued. In doubt — click “Reset password” in the admin panel and enter the new one.
Where on the phone can I see which server it is connected to?#
Menu → Status → More → Accounts (on colour models — Menu → Status → Accounts): shows the accounts and their state. The full server address is visible only in the web UI on the Account → Register page.
Can a Yealink be configured with the QR code from the admin panel?#
No. The QR from the “Extension credentials” window is understood only by the Zoiper and Linphone softphones. A desk Yealink is configured with the fields in the web UI; the “Copy all settings” button gives them as one text — handy to keep in front of you.
The phone came from another provider; after setup it does not register again in the morning#
The previous provider's auto-provisioning server address is still inside: the phone downloads the foreign configuration at every reboot. Do a factory reset and set it up again — or clear Settings → Auto Provision → Server URL.
An employee got a new extension number — what do I change in the phone?#
The login contains the number, so a new number means a new account: in Account → Register rewrite Register Name, User Name and Password from the new “Extension credentials” window. Update the Label too so the screen shows the current number.
Can two extensions be put on one phone?#
Yes, on models with two or more lines: Account → Register → select Account 2 and fill in the second account. T19/T30 have a single line.
Sources#
- Yealink SIP-T46U Quick Start Guide V86.36 (section “Configuring Your Phone”: IP via the OK key, admin/admin login, Account → Register) — https://support-cdn.yealink.com/attachment/document/20211224/dfc97b13-40d3-4808-a9e7-c602489b5fa3.pdf?v=1640312625109
- Yealink T3 Series IP Phones User Guide V86.5 (T30/T31/T33: screen, keys, Menu → Status → Warnings, Reboot, Resetting to Factory Settings — pp. 84–85, administrator password — p. 74) — https://support-cdn.yealink.com/attachment/upload/attachment/2021-3-25/3/4d4437e3-1912-4e11-9bce-d9ed0dd68a0a/Yealink+T3+Series+IP+Phones+User+Guide+V86.5.pdf
- Administrator's Guide for SIP-T2/T3/T4/T5/CP920 IP Phones V86.60 (factory logins admin/admin and user/user — p. 83; Line Active and menu paths — pp. 328–332; SIP Server → Port/Transport; Reset to Factory and reset by long-pressing OK — p. 608; Viewing Device Status — p. 616). Yealink does not serve current editions by direct link (JavaScript documentation portal); copy — https://data.nag.wiki/Yealink/SIP-T53W/Yealink%20SIP-T2%20Series%20T3%20Series%20T4%20Series%20T5%20Series%20CP920%20IP%20Phones%20Administrator%20Guide%20V86.60%20(4).pdf ; official portal — https://support.yealink.com/en/portal/docList?archiveType=document&productCode=809bb158e075168e
- Yealink SIP IP Phones Auto Provisioning Guide V81.73 (y000000000000.cfg / MAC.cfg files, DHCP 66) — https://support.yealink.com/forward2filesystem/attachment/upload/attachment/2017-9-20/3/69be1ab8-91d3-46d7-b6f8-e2c7abe35272/Yealink+SIP+IP+Phones+Auto+Provisioning+Guide_V81_73.pdf
- Source registry of the catalogue:
docs/phone-knowledge/sources/yealink.json