Grandstream DP7xx (DECT) — setting up for our PBX
Grandstream DECT always means two different devices: the base (DP750, DP752, DP755) that sits on a shelf and plugs into the network with a cable, and the handsets (DP720, DP722, DP725, DP730, DP735) that staff carry around. Only the base registers with the PBX: the extension credentials are entered once in its web interface, and a handset is then assigned one of the configured lines. A single base covers a whole floor — up to 300–400 m outdoors and about 50 m indoors — and holds 5 handsets (DP750, DP752) or 10 handsets (DP755).
Everything that is the same for all brands — credentials, ports, network and when a reset is needed — is covered in the overview “Setting up SIP phones”. This page only covers what to press on a Grandstream DECT system.
The order of work differs from a desk phone: you first subscribe a handset to the base (without a handset you cannot even learn the base’s IP address), then log in to the base web interface, create the account there and finally assign it to the right handset.
What you will need#
- Extension credentials from the admin panel: the “Extension credentials” dialog (Telephony → Staff & groups → “Reset password” on the operator, or right when you create one) — SIP server, Extension number, Login, Password, Port, Transport. Details are in the overview.
- The base, plugged with a cable into the staff network of the venue and powered on — from PoE or the supplied power adapter.
- A charged handset: leave it in the cradle for a couple of hours before the first setup. Without a working handset you can neither subscribe it to the base nor read the base’s IP address.
- A computer or laptop on the same network with any browser.
- The label on the bottom or the back of the base — the administrator password is printed on it.
Step 1. Find the base IP address#
The base has no screen, so it shows its IP address through a subscribed handset. Subscription comes first.
1. Open the subscription window on the base. Press and hold the Radio/Page button on the base for about 8 seconds, until the radio icon starts blinking. A plain reboot does the same: after every start-up the subscription window stays open for 2 minutes. A third way is the “Open Subscription” icon in the base web interface (it turns green) — but that needs the IP address you do not have yet.
2. Subscribe the handset. While the icon on the base is blinking, press the Subscribe soft key on the handset (it only appears on an unsubscribed handset) or open Menu → Registration → Register. Choose BaseX (Base1…Base4) and press Subscribe: the handset finds the base, shows its RFPI code and name, then press Subscribe again. On success the screen shows Easy Pairing and the handset returns to the home screen already carrying the name and number issued by the base.
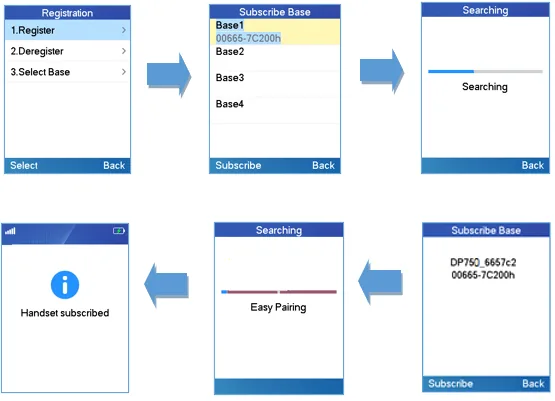 Screenshot: DP752 — Administration Guide, “Registering the Handsets” (documentation.grandstream.com).
3. Read the base IP on the handset. Press Menu, move to the Status icon (the letter “i”) and choose Base Status — the list shows the firmware version, IP Address, subnet mask, gateway and the base MAC address.
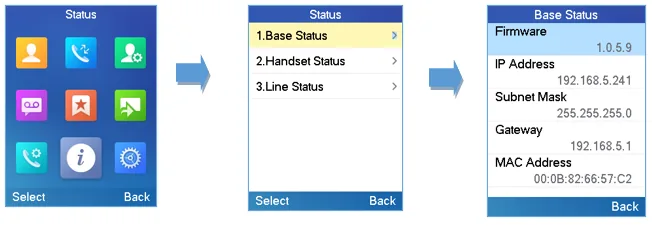 Screenshot: DP752 — Administration Guide, “Obtain DP752 Base Station IP Address via Paired Handsets” (documentation.grandstream.com).
If the address is empty or 0.0.0.0, the base did not get one over DHCP: check the cable and that DHCP is served on the network. You can also find the base address in the device list on the router, by the MAC address printed on its label.
Step 2. Log in to the base web interface#
Open a browser on your computer and enter the base IP — for example http://192.168.5.241.
| Factory value | |
|---|---|
| Address | http://<base IP> |
| Username | admin |
| Password, DP752 and DP755 | the random password printed on the label on the back of the base |
| Password, DP750 | the label on the base for hardware version 1.7A and newer; for earlier versions the password is admin |
| Restricted user | user (password set by the administrator; on the DP755 the factory value is 123) |
On the first login the base immediately offers to change the password — do it and write the new one down: a forgotten administrator password cannot be recovered, only a factory reset helps. You can change it later under Maintenance → Web/SSH Access → Admin Password (on the DP755 — Maintenance → Web Access).
Separately from the web UI password, the base has an administrator PIN — it is requested whenever something is configured from a handset. The factory value is 0000, and the vendor recommends changing it: DECT → General Settings → Admin PIN Code.
Step 3. Enter the PBX credentials#
The account is created in the base web interface. The layout depends on the model: the DP755 has a familiar Accounts tab, while on the DP750 and DP752 the same fields live on two pages — the server address under Profiles, the login and password under DECT → SIP Account Settings.
| In the admin panel (“Extension credentials”) | DP755: Accounts → Account 1 → General Settings | DP750 / DP752 |
|---|---|---|
| — | Account Active: Yes | DECT → SIP Account Settings → Active: Yes |
| SIP server | SIP Server | Profiles → Profile 1 → General Settings → SIP Server |
| Login | SIP User ID and Authenticate ID — the same sip-…-<number> string in both fields |
DECT → SIP Account Settings → SIP User ID and Authenticate ID |
| Password | Authenticate Password | DECT → SIP Account Settings → Password |
| Extension number | Account Name and Name — the line label and the name colleagues see | DECT → SIP Account Settings → Name |
Port 5060 |
part of the SIP Server field: server:5060 (5060 is the default and may be omitted) |
the same SIP Server field of the profile |
Transport UDP |
Account 1 → SIP Settings → Basic Settings → SIP Transport | Profiles → Profile 1 → SIP Settings → Basic Settings → SIP Transport |
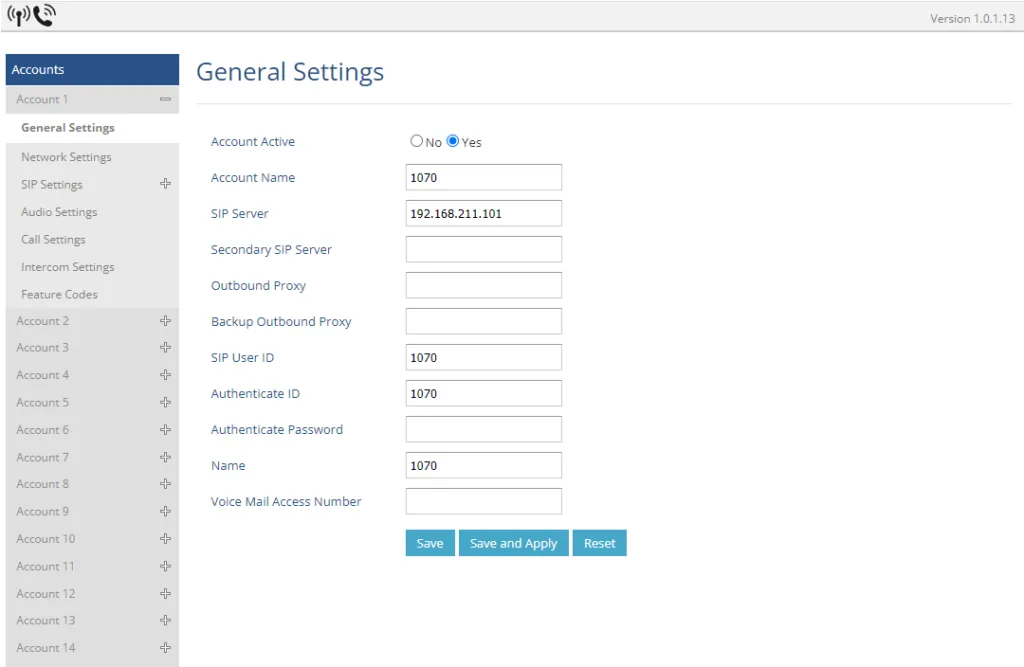 Screenshot: DP755 — Administration Guide, “Register Account via Web User Interface” (documentation.grandstream.com).
Click Save and Apply.
Now assign the line to a handset. Until you do, a registered account will not ring on any handset. Open DECT → Account Assignment (on the DP750 and DP752 — DECT → Handset Line Settings) and tick which handsets (HS1, HS2, …) work with this account, then pick the behaviour on an incoming call in the Ringing Mode column:
- Parallel — all ticked handsets ring at the same time;
- Circular — handsets ring in turn, starting with the one after the last that rang;
- Linear — in turn, always from the first;
- HS x — only that handset rings.
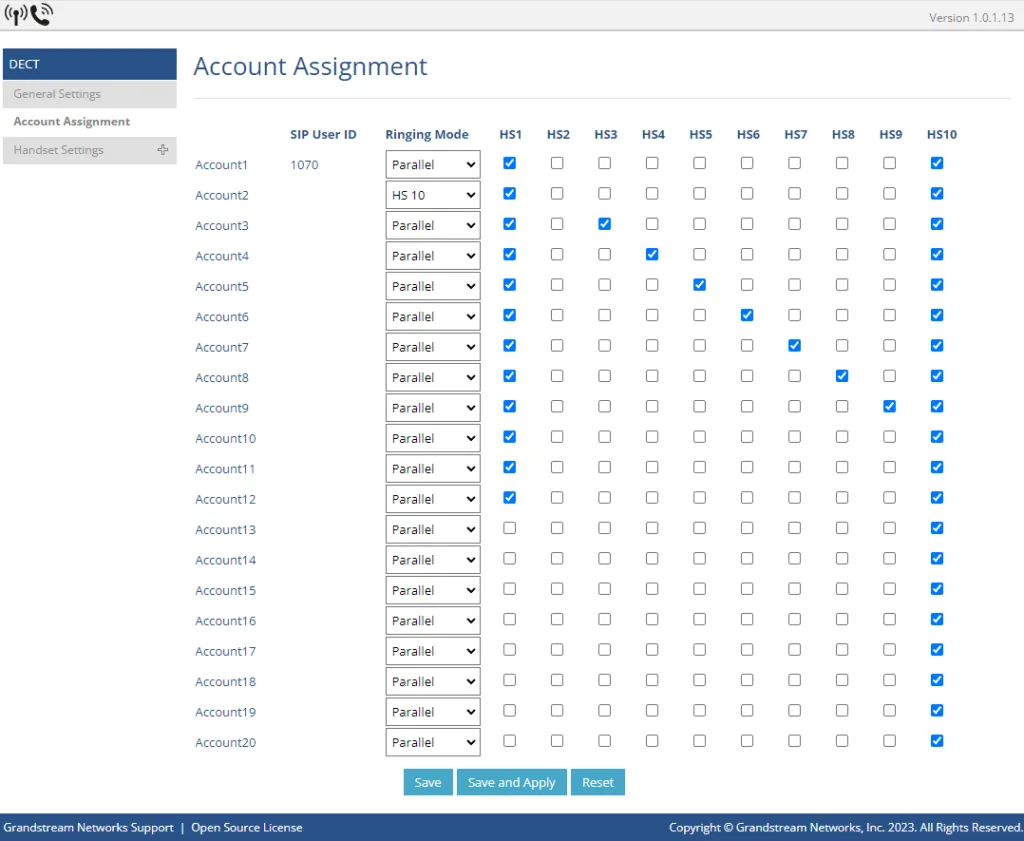 Screenshot: DP755 — Administration Guide, “Account Assignment” (documentation.grandstream.com).
Click Save and Apply.
Optional: codecs, DTMF, NAT, time
None of this needs to change for registration. On the DP750/DP752 all of these live in the profile rather than in the account — that is, they are set once for every line using that profile:
- Codecs — Profiles → Profile 1 → Audio Settings → Vocoder Settings: PCMA (G.711 A-law), PCMU (G.711 µ-law) and G.722 in the top positions.
- DTMF — Profiles → Profile 1 → Audio Settings → DTMF Settings: RFC2833.
- NAT — Profiles → Profile 1 → Network Settings → NAT Settings: off by default; enable Keep-Alive only if audio drops one way. STUN is not needed.
- Time — Settings → Date and Time: the venue’s time zone.
On the DP755 the same sections sit inside the account: Accounts → Account 1 → SIP Settings / Audio Settings / Network Settings.
One account on several handsets, and several accounts on one handset
The base does both: DP750/DP752 hold 10 accounts and 5 handsets, the DP755 holds 20 accounts and 10 handsets, and every handset can be assigned all of the lines at once.
What that means in a venue: one shared “Floor” account in Parallel mode on all the waiters’ handsets — whoever is free hears the guest’s call; plus personal accounts for the manager and the kitchen. Ringing in turn (Circular / Linear) is handy when there are many handsets and you do not want all of them ringing at once.
Step 4. Verify registration#
- In the base web interface. The Status → Account Status tab: your line should show a green YES in the SIP Registration column, with the SIP User ID and SIP Server next to it, and icons on the right showing which handsets the line is assigned to.
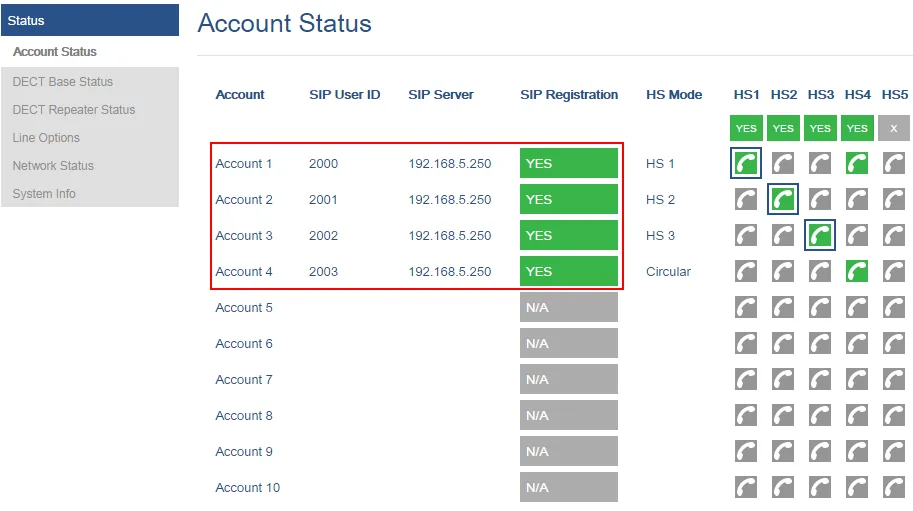 Screenshot: DP752 — Administration Guide, “Account Status” (documentation.grandstream.com).
- On the handset. The idle screen shows the name and number issued by the base. Line states are under Menu → Status → Line Status.
- In the admin panel. Telephony → Staff & groups: the operator gets a green dot, with the time of last activity and the string the base used to introduce itself (for example
Grandstream DP752 124.86.0.130). The status refreshes at most once a minute. - A call. Call a colleague’s extension from the handset and back. If the call goes through but only one side can be heard, that is not registration but the media stream: turn off SIP ALG on the router (see the overview).
Audio quality and radio coverage — the *43 echo test. Dial *43 on the handset and press call: the PBX answers, plays a short beep and then plays your own voice back to you. On DECT this doubles as the only honest coverage test: without hanging up, walk the handset through the floor, the kitchen, the storeroom and the stairs and keep listening to yourself — wherever the echo starts to break up, hiss or drop out, a call with a guest will drop too. Beep but no voice: audio does not reach the PBX from the base (SIP ALG on the router); not even a beep: it does not reach the base from the PBX. Outcomes and numbers are covered in “Checking call quality”.
Factory reset#
With DECT you have to reset two devices separately: the base and the handset keep their settings independently. Resetting the base wipes the accounts, the network settings, the web UI password and the handset subscriptions; resetting a handset wipes its own settings and its link to the base. The firmware survives in both cases.
The base, with the button on the unit: press and hold Radio/Page for about 30 seconds, until all the LEDs blink rapidly several times and the base reboots. Important: after 8 seconds the base opens the handset subscription window — do not release the button, keep holding until the reset.
The base, from the web interface: Maintenance → Factory Reset → pick the type in the Reset Type list → Reset → confirm with OK. The base reboots by itself.
A handset, from its menu: Menu → Settings → System Settings → Factory Reset → confirm with the left soft key Yes. The handset reboots.
A handset that hangs before you can reach the menu: reset with a key combination at start-up — connect the USB cable, power the handset off, power it on and wait for the green LED; once the reset is triggered the LED starts blinking green, red and orange.
When you need this: the base came second-hand (someone else’s accounts inside and, worse, another provider’s provisioning server address — it will overwrite your setup on every reboot); the administrator password is lost; a handset will not subscribe to your base because it remembers four other ones.
After a reset everything starts over: step 1 — subscribe a handset, step 2 — log in with the label password, step 3 — enter the credentials. The base administrator PIN also returns to 0000.
If the base does not register#
In order, from common to rare:
- The account is disabled. On the DP755 — Accounts → Account 1 → General Settings → Account Active: Yes; on the DP750/DP752 — the Active tick box in the account row on the DECT → SIP Account Settings page.
- The login is not complete. SIP User ID and Authenticate ID must contain
sip-…-<number>, not “101”. Check both fields. - The password is stale. If somebody pressed “Reset password” in the admin panel, the old one no longer works. Issue a new one and retype it — the password field always shows up empty, that is normal.
- The server address is in the wrong place. On the DP750/DP752 the PBX address is not in the account row but in Profiles → Profile 1 → General Settings → SIP Server; in the account itself check that the Profile column points at the profile you filled in.
- SIP Transport was changed. It must be UDP: our credentials assume it, and the platform does not offer TLS at all.
- Registered, but the handset does not ring. That is not registration but line assignment: open DECT → Account Assignment (on the DP750/DP752 — Handset Line Settings) and tick the handset for this account.
- The network. Outgoing UDP 5060 and UDP 10000–20000 to the PBX address are required, with SIP ALG turned off on the router. A base in a guest Wi-Fi segment or in a separate VLAN will not reach the PBX.
- Settings “change by themselves” after a reboot — the base pulls the previous owner’s configuration from a provisioning server: clear Maintenance → Provisioning → Config Server Path or do a factory reset.
Still stuck — or the phone is registered but there is no audio, calls drop after 30 seconds, incoming calls do not arrive? Troubleshooting by symptom — “Phone not working”; on-screen messages and error codes — “Not registering: error codes”.
Models in the family#
The DP750 and DP752 web interfaces are identical; the DP755 has a newer one — accounts moved to a dedicated Accounts tab, and line assignment is called Account Assignment. The handsets differ in screen, ruggedness and battery life, but are configured and subscribed in exactly the same way.
Model table
| Model | What it is | PoE | Setup specifics |
|---|---|---|---|
| DP750 | base: 5 handsets, 10 accounts, 300 m outdoors / 50 m indoors | yes | the admin password is on the label only for hardware version 1.7A and newer; earlier ones use admin |
| DP752 | base: 5 handsets, 10 accounts, up to 400 m outdoors / 50 m indoors | yes | label password; accounts under DECT → SIP Account Settings, server under Profiles |
| DP755 | base: 10 handsets, 20 accounts, up to 16 simultaneous calls | yes | new interface: the Accounts tab, line assignment under DECT → Account Assignment |
| DP720 | handset: 1.8" colour screen, up to 300 m outdoors | — | subscription and menus as on the other handsets |
| DP722 | handset: 1.8" colour screen, up to 350 m outdoors | — | — |
| DP725 | handset: 1.8" colour screen, up to 400 m outdoors | — | — |
| DP730 | handset: 2.4" colour screen, up to 400 m outdoors, 3.5 mm headset jack | — | — |
| DP735 | handset: 2.4" colour screen, ruggedized body, up to 65 h talk time | — | the “warehouse and floor” version: configured the same way |
DP710 and DP715 are the previous, discontinued generation of Grandstream DECT: a different web interface, and the vendor’s documentation no longer lists them, so the steps on this page do not apply. The extension credentials are the same (see the overview), but look up the field names in the manual that came with the unit; for a venue still running such a base, planning a replacement with a DP752 or DP755 makes more sense.
Frequently asked questions#
The handset does not find the base during subscription#
The subscription window on the base is open only for a while: after you press Radio/Page the radio icon blinks, and after a reboot the window stays open for 2 minutes. If it closed, open it again and repeat Menu → Registration → Register on the handset. The second cause is a handset that remembers four other bases: there is no free Base1…Base4 slot, so free one or reset the handset.
The account is registered (green YES), but the handset does not ring#
The base registers, the handset rings — line assignment is what connects them. Open DECT → Account Assignment (on the DP750/DP752 — DECT → Handset Line Settings), tick the handsets for that account and click Save and Apply.
How many staff does one base cover?#
The DP750 and DP752 take up to 5 handsets and 5 simultaneous calls, the DP755 up to 10 handsets. If you need more handsets, or the floor is out of range, add a second base (each has its own account and its own web interface) or a DP760 repeater.
The base has no screen — how do I find its IP if there are no handsets yet?#
Only from the network side: look at the device list on the router and find the base by the MAC address on its label. The regular route is still through a handset — step 1.
The handset asks for a PIN nobody knows#
That is the base administrator PIN, requested when configuring from a handset. The factory value is 0000. If it was changed and lost, set a new one in the base web interface: DECT → General Settings → Admin PIN Code.
Can one account live on both a handset and a desk phone?#
Yes: an account registers on several devices at once and a call reaches all of them. Keep in mind that on the base side this is still one of its 10 (or 20) accounts and it must be assigned to a handset in Account Assignment.
Sources#
- DP752 — Administration Guide (handset subscription and “Open Subscription”, Base Status with the IP address, the factory password table, DECT → SIP Account Settings and Handset Line Settings, Profiles → SIP Settings, the 0000 admin PIN, resetting the base with the Radio/Page button and via Maintenance → Factory Reset, resetting a handset) — https://documentation.grandstream.com/knowledge-base/dp752-administration-guide/
- DP750 — Administration Guide (administrator password: the label on hardware version 1.7A and newer,
adminon earlier ones; base capacity) — https://documentation.grandstream.com/knowledge-base/dp750-administration-guide/ - DP755 — Administration Guide (the Accounts → General Settings tab and the “Register a SIP Account” procedure, DECT → Account Assignment and the ringing modes, 10 handsets and 20 accounts, resetting the base and the handsets) — https://documentation.grandstream.com/knowledge-base/dp755-administration-guide/
- DECT Handsets — User Guide (DP720/DP722/DP725/DP730/DP735: screens, range, Menu → Settings → System Settings → Factory Reset, reset with a key combination at start-up) — https://documentation.grandstream.com/knowledge-base/dect-handsets-user-guide/
- Source registry of the catalogue:
docs/phone-knowledge/sources/grandstream.json